เพื่อให้เข้ากับยุคสมัย ผมก็เลย download
GWT มาลองเล่นดู
เป้าหมายเพื่อให้รู้ว่า Architecture ของมันเป็นอย่างไร
เริ่มที่ขั้นแรกสุด ก็คือ ลองสร้าง project ง่ายๆพวก HelloWorld ขึ้นมา
(ในที่นี้ผมจะลองสร้างแต่ project ที่ใช้ eclipse เป็น IDE)
projectCreator -eclipse Hello
ผลลัพท์ของคำสั่งนี้ จะได้ file structure ออกมาดังนี้
  + src               # empty directory
  .classpath          # eclipse build configuration file
  .project            # eclipse project file
จากนั้นก็ทำการ generate project files
applicationCreator -eclipse Hello pok.client.Hello
คำสั่ง applicationCreator จะสร้าง file ให้เราดังนี้
  + src
    + pok
      + client
          Hello.java
      + public
          Hello.html
        Hello.gwt.xml
    Hello.launch
    Hello-shell
    Hello-compile
- Hello.launch
เป็น configuration file ที่ Eclipse JDT ใช้
ในการ run ใน Hosted Mode (mode ที่ใช้ java เป็นหลัก)
- Hello-shell
ใช้ run ใน Hosted Mode เหมือนกัน แต่เป็นการ
start จาก command-line (แทนที่จะ run จากใน eclipse)
- Hello-compile
ใช้ในการ compile java file ให้เป็น javascript
เพื่อที่จะได้นำไป deploy
- Hello.java
file หลัก ที่กำหนด Dynamic Behavior
- Hello.html
Template File
- Hello.gwt.xml
Configuration File
ลองดูหน้าตาของ Hello.java
public class Hello implements EntryPoint {

  /**
   * This is the entry point method.
   */
  public void onModuleLoad() {
    final Button button = new Button("Click me");
    final Label label = new Label();

    button.addClickListener(new ClickListener() {
      public void onClick(Widget sender) {
        if (label.getText().equals(""))
          label.setText("Hello World!");
        else
          label.setText("");
      }
    });

    RootPanel.get("slot1").add(button);
    RootPanel.get("slot2").add(label);
  }
}
จะเห็นว่าการเขียนมีลักษณะเดียวกับพวก Swing, AWT
ซึ่งในทาง Web Application เราจะเรียก Style การเขียนแบบนี้ว่า
"Component Centric" (Struts เป็นพวก Action Centric)
ลองดู Template บ้าง
<html>
<head>
<title>Wrapper HTML for Hello</title>
<style>
body,td,a,div,.p{font-family:arial,sans-serif}
div,td{color:#000000}
a:link,.w,.w a:link{color:#0000cc}
a:visited{color:#551a8b}
a:active{color:#ff0000}
</style>
<meta name='gwt:module' content='pok.Hello'>
</head>
<body>
<script language="javascript" src="gwt.js"></script>
<iframe id="__gwt_historyFrame" style="width:0;height:0;border:0"></iframe>
<h1>Hello</h1>
<table align=center>
<tr>
<td id="slot1"></td><td id="slot2"></td>
</tr>
</table>
</body>
</html>
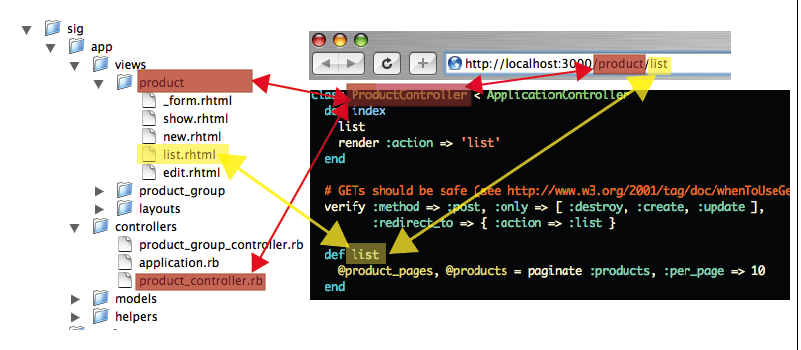
จะเห็นว่าแนวทางจะเหมือน WebObject ของ Apple,
หรือถ้าพวก java ก็คือ Tapestry (Tapestry ได้แรงบันดาลใจจาก WebObject)
โดยมีการ map tag ใน Template เข้ากับ java component
ส่วนที่น่าสนใจ สำหรับ Hosted Mode ก็คือ
โปรแกรมส่วน Browser พัฒนาโดยใช้ Eclipse SWT
โดยมี Mozilla เป็น embed browser
เมื่อเราต้องการที่จะ run ทดสอบ
เราก็จะ start Hosted mode โดยใช้ script
Hello-shellซึ่งการทำงานภายใน จะมีการเรียกใช้ tomcat เป็น server
และใช้ Servlet เป็นตัว provide Dynamic generate Javascript
ตอนพัฒนาใน mode ของ Java นี่ไม่ค่อยตื่นเต้นเท่าไร
ลองไปดู ผลลัพท์ที่ได้จากการ compile ดูบ้าง
structure ที่เกิดจากการ compile มีหน้าตาดังนี้
 + pok.Hello
   6C111FAEE0653F4BBB3843A644BBC3B9.cache.html
   6C111FAEE0653F4BBB3843A644BBC3B9.cache.xml
   716702EAD597E14C305C093A453D09E0.cache.html
   716702EAD597E14C305C093A453D09E0.cache.xml
   BCF8E41DC1EA80A1D898F3F24A8B0E79.cache.html
   BCF8E41DC1EA80A1D898F3F24A8B0E79.cache.xml
   C23A120D5B9051FB13E2470D6906FE0B.cache.html
   C23A120D5B9051FB13E2470D6906FE0B.cache.xml
   gwt.js
   hello.html
   history.html
   pok.Hello.nocache.html
   tree_closed.gif
   tree-open.gif
   tree_white.gif
file ที่เราเรียกใช้งาน ก็คือ
hello.htmlซึ่งภายในจะไป load
gwt.js ขึ้นมาทำงาน
หน้าที่ของ gwt.js ก็คือมันจะ inject web framework เข้ามาทาง iframe
ดูได้จากคำสั่ง
function __gwt_injectWebModeFrame(name) {
if (document.body) {
var parts = __gwt_splitModuleNameRef(name);
var iframe = document.createElement("iframe");
var selectorURL = parts[0] + parts[1] + ".nocache.html";
iframe.src = selectorURL;
iframe.style.border = '0px';
iframe.style.width = '0px';
iframe.style.height = '0px';
if (document.body.firstChild) {
document.body.insertBefore(iframe, document.body.firstChild);
} else {
document.body.appendChild(iframe);
}
} else {
window.setTimeout(function() { __gwt_injectWebModeFrame(name); }, __gwt_retryWaitMs);
}
}ถ้าดูจาก source code จะเห็นว่า มัันไป load เอา
pok.Hello.nocache.html ขึ้นมาทำงาน
ตามไปดูใน pok.Hello.nocache.html
ข้างในจะเป็น javascript ทีทำหน้าที่แค่เป็น Loader
โดยจะทำการตรวจสอบสภาพแวดล้อม ว่าเป็น browser แบบไหน
แล้วก็เรียกใช้ javascript ให้ถูกตัว
ซึ่งถ้าดูจาก source code จะเห็นว่า support browser อยู่ 4 พวก
ก็คือ Mozilla, IE, Safari, Opera
function selectScript() {
  try {
    var F;
    var I = ["true", (F=window["prop$user.agent"],F())];

    O(["true","oldmoz"],"6C111FAEE0653F4BBB3843A644BBC3B9");
    O(["true","moz"],"6C111FAEE0653F4BBB3843A644BBC3B9");
    O(["true","ie6"],"716702EAD597E14C305C093A453D09E0");
    O(["true","safari"],"BCF8E41DC1EA80A1D898F3F24A8B0E79");
    O(["true","opera"],"C23A120D5B9051FB13E2470D6906FE0B");

    var strongName = O.answers[I[0]][I[1]];
    location.replace(strongName + '.cache.html');
  } catch (e) {
    // intentionally silent on property failure
  }
}
รหัส
6C111FAEE0653F4BBB3843A644BBC3B9 ก็คือ
ชื่อ file
6C111FAEE0653F4BBB3843A644BBC3B9.cache.html นั่นเอง
ภายใน file นี้ จะเป็น framework ที่ google เขียนขึ้นมาแล้ว
แต่เนื่องจากถูกลดรูปไว้แล้ว ก็เลยหมดปัญญาที่จะแกะ
ดูจากวิธีการของ framework นี้แล้ว ข้อดี ก็คือ
สำหรับคนที่ใช้ java อยู่แล้ว จะพัฒนาได้เร็ว
แถมยัง debug ได้ง่าย เนื่องจากยัง debug อยู่ใน java อยู่
เมื่อจะ deploy ก็ค่อยแปลงเป็น javascript
ข้อสงสัย สำหรับบางคน ก็คือแล้ว มันมีส่วน server ด้วยหรือเปล่า
ตัว GWT provide RPC API มาให้เราด้วย
วิธีใช้ ก็แค่เขียน Service โดย extend RemoteServiceServlet
import com.google.gwt.user.server.rpc.RemoteServiceServlet;

public class SchoolCalendarServiceImpl extends RemoteServiceServlet
โดยใน file gwt.xml ก็ระบุด้วยว่า
<module>
  <inherits name='com.google.gwt.user.User'/>
  <entry-point class='com.google.gwt.sample.dynatable.client.DynaTable'/>
  <servlet path='/calendar' class='com.google.gwt.sample.dynatable.server.SchoolCalendarServiceImpl'/>
</module>
พอจะใช้ ก็แค่
calService = (SchoolCalendarServiceAsync) GWT
.create(SchoolCalendarService.class);
ServiceDefTarget target = (ServiceDefTarget) calService;
target.setServiceEntryPoint("/calendar");
calService.getPeople(startRow, maxRows, new AsyncCallback() {
        public void onFailure(Throwable caught) {
          acceptor.failed(caught);
        }

        public void onSuccess(Object result) {
          Person[] people = (Person[]) result;
          lastStartRow = startRow;
          lastMaxRows = maxRows;
          lastPeople = people;
          pushResults(acceptor, startRow, people);
        }

      });
ดูแล้ว ก็ไม่ยากอะไร
สิ่งที่ GWT ไม่ได้เตรียมมาให้ สำหรับส่วน server ก็คือ
script ที่ใช้ในการ pack war เพื่อไป deploy remote service
บน Application Server ที่เราต้องการ