Saturday, November 12, 2005

Behaviour Driven Development

ช่วงนี้เริ่มได้ยินศัพท์ BDD มากขึ้น
BDD ย่อจาก Behavior Driven Development
เป็น concept ที่ evolve มาจาก TDD
หรืือ Test Driven Development

ที่เกิด concept ใหม่นี้ขึ้นมาก็เพราะ
เขามองกันว่า TDD มันใช้ wording ที่มีแต่คำว่า "test"
เช่น เราเขียน TestCase ซึ่งภายในมี method testXXX
และ run TestCase ด้วย TestRunner
ไอ้คำว่า "Test" ทั้งหลายนี่มัน block
mental ของเราให้เห็นแต่เรื่อง test
(บางคนก็มี mental block ที่ว่า ยังไม่ทันเขียน program เลย
จะให้เขียน test ได้อย่างไร)


Sapir-Whorf hypothesis (SWH)
there is a systematic relationship between the
grammatical categories of the language a person
speaks and how that person both understands the
world and behaves in it


BDD ก็เลยเกิดขึ้นมา
โดยพยายามเปลี่ยน wording เพื่อให้
หลีกเลี่ยง mental block
โดยพยายาม shift ไปสู่ Specification หรือ Behavior แทน

BDD focus บน

Bob Martin’s "Specification, not Verification"
  • you’re not verifying that the code works correctly
  • you’re specifying what it means for it to work correctly


ตอนนี้เท่าที่เห็น opensource project ที่เริ่มทำกันก็มี


ซึ่งถ้าตามไปดูเอกสารของทั้ง 2
ก็ดูเหมือนว่า มันเป็นแค่การเปลี่ยนแค่คำศัพท์ที่ใช้เท่านั้น
เช่นจาก assert -> should
ก็ต้องตามดูกันต่อไปว่า
แค่การเปลี่ยนศัพท์เฉยๆ จะทำให้เกิด effect อย่างที่เขาว่าจริงหรือไม่

แต่มี Idea ที่น่าสนใจอยู่อัน
อันนี้เจอที่ obie, has it been 9 years already?
เขาลองร่าง DSL (Domain Specific Language) ที่ implment ด้วย ruby ขึ้นมา
หน้าตาแบบนี้ (จริงๆไม่อยาก copy มาเท่าไรเลย แต่อยากให้เห็นภาพกัน)

actors :audits => Audit::Logger,
:db => PayrollDatabase,
:employee => Employee,
:transaction => Transaction

story "A new employee is added by the receipt of an AddEmployee message." do

Name = "William Jones"
AnnualSalary = 60000
MonthlySalary = 5000
MonthlyType = Employee::Monthly

scenario "add a salaried employee earning 60k per year" do

db.pretend! do
on_create :with => (:name => Name, :salary => AnnualSalary),
:return => Employee.new(Name, MonthlyType, AnnualSalary)
end

transaction = AddSalariedEmployeeMsg.new(Name, AnnualSalary)
transaction.execute()

to_verify do
employee = db.find_by_name(Name)
employee_classification == MonthlyType
employee_salary == MonthlySalary

audits_received :log, NEW_EMPLOYEE
end

end

end

เห็นแล้วรู้สึกน่าสนใจทีเดียว
และก็ชอบตรงที่ Obie เขียนว่า

I started figuring out that there are significantly better ways to achieve the goals of RSpec in Ruby, as long as we remember that Ruby is not Java.


Note:
blockquote ตัดมาจาก presentation ของ Dave Astels

Related link from Roti

Friday, November 11, 2005

gem_server

[ruby]

สงสััยมานานแล้ว
เวลาที่เรา install ruby module ด้วยคำสั่ง gem install
มันจะมีอยู่ช่วงหนึ่งที่มัน generate rdoc ให้เรา
ซึ่ง rdoc ที่ generate ก็ช่างซ่อนอยู่ใน directory
ที่ยากแก่การเข้าถึงเสียเหลือเกิน

พึงรู้วันนี้ว่ามีคำสั่ง gem_server
ที่ start webbrick บน port 8808
ทำให้เรา access rdoc ได้จาก browser

Related link from Roti

DWR

DWR - Direct Web Remoting
คือ framework ที่ช่วยให้เราสามารถ acesss
Java Object ที่อยู่บน Server ได้จาก javascript โดยตรง
ซึ่ง feature ที่น่าสนใจก็คือ มันสามารถใช้กับ spring bean ได้ด้วย

ลองดูตัวอย่าง
สมมติเรามี Bean ที่ทำหน้าที่ค้นหาชื่อลูกค้า

public class CustomerSvr {
.. // hibernate stuff

public List findCustomerByName(String name) {
...
}

}

public class CustomerDao {
private long id;
private String name;

.. // setter & getter here
}


ถ้าเราต้องการให้ DWR expose CustomerSvr
ก็ต้อง config ดังนี้
เริ่มจาก add DWR Servlet ก่อน

<servlet>
<servlet-name>dwr-invoker</servlet-name>
<display-name>DWR Servlet</display-name>
<servlet-class>uk.ltd.getahead.dwr.DWRServlet</servlet-class>
<init-param>
<param-name>debug</param-name>
<param-value>true</param-value>
</init-param>
</servlet>

<servlet-mapping>
<servlet-name>dwr-invoker</servlet-name>
<url-pattern>/dwr/*</url-pattern>
</servlet-mapping>

จากนั้นก็ต้อง config DWR ว่ามี Bean อะไรที่ expose function
ให้ javascript เห็นได้บ้าง

<?xml version="1.0" encoding="ISO-8859-1"?>
<!DOCTYPE dwr PUBLIC
"-//GetAhead Limited//DTD Direct Web Remoting 1.0//EN"
"http://www.getahead.ltd.uk/dwr/dwr10.dtd">

<dwr>
<allow>
<convert
converter="bean"
match="service.*"/>

<create
creator="spring"
javascript="customerSvr">
<param name="beanName" value="customerSvr"/>
</create>
</allow>
</dwr>

โดยเราสามารถกำหนด
  • method อะไรที่ต้องการให้เห็นบ้าง
  • วิธีการ convert ผลลัพท์ที่ได้
    เท่าที่เห็นคร่าวๆ ก็มี
    • Bean converter
    • Hibernate converter
      ต่างกับ bean converter ตรงที่ทำ lazy loaded properties ได้
    • JDom Converter


ให้สังเกตุว่าเราใช้ creator="spring"
เป็นการบอกว่าให้ไป lookup หา bean จาก spring context

ถ้า config ไว้ถูกต้อง เราก็จะสามารถทดสอบการทำงานเบื้องต้นได้โดย
ใช้ browser เปิด url http://server:port/dwr/
DWR servlet จะแสดงหน้าจอที่ใช้ในการทดสอบการทำงานของ Bean เรา


ที่นี้ลองดูที่ฝั่ง javascript บ้าง
ถ้าต้องการที่จะ call CustomerSvr
ที่ฝั่ง javascript จะเขียนดังนี้

เริ่มจากให้ include generated script ก่อน

<script type='text/javascript' src='/dwr/interface/customerSvr.js'></script>
<script type='text/javascript' src='/dwr/engine.js'></script>
<script type='text/javascript' src='/dwr/util.js'></script>


ส่วน script ที่เรียกใช้งาน หน้าตาดังนี้

<script>

function findCustomerName(name) {
customerSvr.findByName(name, displayCustomerName);
}

function displayCustomerName(customers) {
var x = $("custName");

var text = 'Customers: <br><ul>';
for(i = 0; i < customers.length; i++) {
text += '<li>';
text += customers[i].name;

text += ' (';
text += customers[i].id;
text += ')';
text += '</li>';
}
x.innerHTML = text;
}

</script>

มีที่น่าสังเกตุคือ เราเรียกใช้ bean โดยอ้างถึงชื่อที่เรา config ใน dwr.xml ได้เลย
ในที่นี้ก็คือประโยค customerSvr.findByName
แต่ต้องเพิ่ม callback function เข้าไปใน parameters ที่ส่งให้ findByName ด้วย

ส่วนใน callback function จะเห็นว่า
เราใช้ $('xxx') ซึ่งเป็น util function
ที่เรา include เข้ามาจาก DWRUtil.js
โดย function นี้ใช้ในการ access DHTML Element

สุดท้ายก็คือ html element ที่เรียกใช้งาน

<body>
<input type="text" onBlur="findCustomerName(this.value)"/><br/>
<span id="custName">Name<span>
</span>
</body>


ข้อดีของ DWR
จะเห็นว่า DWR ซ่อนรายละเอียดต่างๆไว้เบื้องหลังหมด
เราแค่รู้ชื่อ service กับชื่อ method ตลอดจน return structure เท่านั้นเอง

ข้อเสียเท่าที่เห็น ก็มี
เนื่องจาก object ที่ส่งกลับ ต้องมีการทำ serialize กับ deSerialize
ดังนั้น object ที่ DWR support สามารถใช้ได้ก็จะมีจำกัด
ส่งผลให้บางครั้ง เราต้องเพิ่ม method ที่ให้ผลลัพท์แบบที่ DWR สามารถ convert ได้
ทำให้มี method ที่ redundant ใน business layer เพิ่มขึ้นจำนวนหนึ่ง

อ่านเพิ่มเติมได้ที่นี่
Ajax with Direct Web Remoting

Related link from Roti

ri18n error on Windows Platform

สืบเนื่องจาก post เรื่อง ri18n ในครั้งก่อน
ได้รับแจ้งว่า ไม่สามารถ run บน windows platform ได้
โดยเกิด error เมื่อเรียกใช้ rake i18n

C:\users\pok\rails\test>rake i18n
(in C:/users/pok/rails/test)
rake aborted!
uninitialized constant Catalog::Iconv


ค้นหาบน google พบว่าเกิดจาก missing library ที่ชื่อ iconv
โดย ruby ที่ install จาก one install click
จะไม่ include library ตัวนี้ให้เรา
เราต้อง install library เอง
ตัว installer ของ iconv หาได้จากที่นี่ link

Related link from Roti

Wednesday, November 09, 2005

Spring 's Configuration file with Jacn

ปัจจุบันผมใช้ Spring framework
เป็น container หลักในการพัฒนา Application
แต่มีปัญหาหนึ่งที่กวนใจอยู่บ้าง
ก็คือ configuration file ของ spring
ซึ่งประเด็นปัญหาที่กวนใจก็คือ
  • การอ่าน xml file
    ถ้าใครเคยเปิด config file ที่ตัวใหญ่ๆดู
    จะรู้ว่ามันลายตาขนาดไหน มีแต่คำว่า bean เต็มไปหมด
  • การ edit xml file
    เรื่องสะกดผิด เป็นเรื่องปกติ
    ซึ่งต้อง run ก่อนจึงจะเห็น stack trace ที่เกิดขึ้น


ใน post นี้จะพูดถึงกรณีที่ 2 เพียงอย่างเดียวก่อน
solution ที่มักใช้กันสำหรับปัญหานี้ก็คือ
Spring IDE
ซึ่งก็ใช้ได้ดีที่เดียว เพียงแต่มีข้อจำกัดว่า project เราต้องใช้ Eclipse ในการพัฒนา

solution อีกอันหนึ่งสำหรับประเด็นปัญหานี้ก็คือ
Jacn (ไม่รู้ย่อมาจากอะไร)
ซึ่งเปลี่ยนจากการ config ด้วย xml file
ไปเป็นการ config ด้วย java file แทน

ลองดูตัวอย่าง config file
กรณีใช้ xml file
<?xml version="1.0" encoding="UTF-8"?> 
<!DOCTYPE beans PUBLIC "-//SPRING//DTD BEAN//EN"
"http://www.springframework.org/dtd/spring-beans.dtd">
<beans>
<bean id="messageSvr" class="test.MessageImpl"/>

<bean id="greeting" class="test.Greeting">
<property name="messageSvr" ref="messageSvr"/>
</bean>
</beans>


กรณีใช้ Jacl
package test;

import bran.spring.jacn.AbstractJacnConfigFile;

public class Beans extends AbstractJacnConfigFile {

static Greeting greeting;
static MessageImpl messageImpl;

public void wire() throws Exception {
greeting.setMessageSvr(messageImpl);
}

}


เวลาเรียกใช้งาน ApplicationContext
เราจะเรียกใช้ผ่านทาง bran.spring.jacn.JacnApplicationContext แทน
ตามตัวอย่างนี้
public class TestJacn extends TestCase {

ApplicationContext context;

protected void setUp() throws Exception {
context = new JacnApplicationContext(test.Beans.class);
}

public void test() {
Greeting greeting = (Greeting) context.getBean("greeting");
assertEquals("hello world", greeting.getMessage());
}

}


ข้อดีสำหรับ Jacn ก็คือ แทนที่จะเขียน xml โดยตรง เราก็เปลี่ยนมา
เขียน java แทน ซึ่งทำให้เราสามารถใช้ feature code completion
เข้ามาช่วยเขียน รวมทั้งใช้ javac ช่วยในการตรวจสอบ validation ได้ด้วย

การทำงานภายในของ Jacn ที่น่าสนใจก็คือ
คนเขียนเขาใช้วิธีการแปลง class file ที่เราเขียน ให้เป็น DOM
ซึ่งอยู่ในรูปแบบเดียวกับที่ spring ใช้ในอ่าน xml file
เมื่อได้ DOM มาแล้วก็ค่อยส่งต่อให้ spring เป็นผู้ resolve และทำ dependency injection ต่อไป

ส่วนวิธีการที่ใช้ implement การแปลง class file ไปเป็น DOM นั้น
เขาใช้ ASM เข้ามาช่วยทำ โดย Implement ClassVisitor ขึ้นมา

Related link from Roti

Tuesday, November 08, 2005

NASA & Eclipse RCP


Did you know that one of the mission-critical operations tools for the Spirit and Opportunity Mars rover mission is built on the Eclipse Rich Client Platform? NASA has also chosen the Eclipse Rich Client Platform as the framework for many of the mission operations tools that will be used on the 2007 Mars lander and 2009 Mars rover missions.


อ่านรายละเอียดใน blog ของ Scott Schram's Blog

Related link from Roti

Friday, November 04, 2005

ri18n

คุณยุทธถามมาเรื่อง ruby module ri18n
ที่ใช้ทำ localization
ได้เรื่องเลย เรื่องนี้เป็นเรื่องที่ผม postpone มานานแล้ว
เห็นทำ app ภาษาไทยได้ก็พอใจแล้ว ยังไม่ได้มองกรณีทำหลายภาษาเลย

หลังจากสั่ง

gem install ri18n


ก็ได้ source code มาจำนวนหนึ่ง
ตัวเอกสารไม่ต้องพูดถึง มีน้อยมาก
การใช้งานพึงแกะจาก source code เป็นหลัก

Note: ผมแกะมาพอให้เริ่มใช้งานได้นะครับ
ยังมีรายละเอียดอีกจำนวนหนึ่งที่ยังไม่ได้ดู
เช่น catalog, interpolation, phurals form


การใช้งาน ri18n กับ RoR
  • Environment Setup
    แก้ไข file config/environment.rb
    เพิ่มเนื้อหาส่วนนี้ลงไป
    # Include your app's configuration here:
    require 'i18nservice'

    I18nService.instance.po_dir="#{RAILS_ROOT}/i18n"

    ให้สังเกตว่าเราจะมี directory ที่ชื่อ i18n ที่จะไว้ใช้เก็บ
    po file (translation file)
    ข้อสังเกตอีกอัน ก็คือ I18nService ใช้ sigleton pattern
    ดังนั้นเราจึง access ผ่าน instance attribute

  • การแสดง message ใน views
    ในการ render output ใน rhtml
    แทนที่จะเขียนออกไปตรงๆ เราจะใช้สัญญลักษณ์ _('msgid') แทนที่ msg ที่เราต้องการ
    <html>
    <head>
    <title>hello</title>
    </head>
    <body>
    <p>
    <%= _('hello') %>
    </p>
    </body>
    </html>


  • เพิ่ม Task i18n ใน Rakefile
    โดย ri18n ได้เตรียม Rake Task ที่ชื่อ gettext ไว้แล้ว
    gettext นี้มีหน้าที่ scan file เพื่อหา msg ที่ต้องการทำ translation
    เพื่อทำการ genereate .po file ให้เรา
    ...
    require 'gettext'
    require 'i18nservice'

    ...
    RAILS_ROOT=File.dirname(__FILE__)
    ...

    desc "generate po (i18n) file"
    Rake::GettextTask.new { |gettext|
    gettext.source_files = FileList['**/*.rhtml']
    gettext.new_langs = ['th','en']
    I18nService.instance.po_dir="#{RAILS_ROOT}/i18n"
    }

    desc "create directory for i18n po file"
    task :mki18ndir do
    Dir.mkdir("i18n") unless File.exists?("i18n")
    end

    task :i18n => [:mki18ndir, :gettext]

    จะเห็นได้ว่าเรามีการ config task class ที่ชื่อ Rake::GettextTask
    โดยระบุว่าให้ scan message ที่ต้องการแปลงจาก file ที่มีนามสกุลเป็น rhtml
    และระบุด้วยว่า ให้สร้าง po file สำหรับ language 2 ภาษา ก็คือ thai (th) กับ english (en)
    Note: ผมทำแบบ struts ก็คือ ใน views ระบุเป็น message id
    เราสามารถทำอีกแบบได้ ก็คือ ใน views เป็น english แล้วทำเฉพาะส่วนแปลเป็น th


  • generate po file
    โดยใช้คำสั่ง rake i18n
    จะได้ file ออกมา 2 file ก็คือ th.po กับ en.po

  • ทำการแปล
    โดยการ add message ที่ต้องการลงไปใน po file
    ขั้นนี้ผมยังไม่ได้ลองเรื่อง encoding เลย
    ที่ทดลองทำก็คือแค่ใช้ editor ที่ save encoding เป็น utf-8 ได้
    ทำการ edit file เพิ่มเนื้อหา ภาษาไทย ลงใน file th.po
    ส่วน file en.po ก็เพิ่มส่วน ภาษาอังกฤษ ลงไป
    ตัวอย่าง file th.po
    Ôªø# SOME DESCRIPTIVE TITLE.
    # Copyright (C) YEAR Free Software Foundation, Inc.
    # This file is distributed under the same license as the PACKAGE package.
    # FIRST AUTHOR <EMAIL@ADDRESS>, YEAR.
    #
    #, fuzzy
    msgid ""
    msgstr ""
    "Project-Id-Version: PACKAGE VERSION\n"
    "PO-Revision-Date: YEAR-MO-DA HO:MI+ZONE\n"
    "POT-Creation-Date: 2002-12-10 22:11+0100\n"
    "Last-Translator: FULL NAME <EMAIL@ADDRESS>\n"
    "Language-Team: LANGUAGE <LL@li.org>\n"
    "MIME-Version: 1.0\n"
    "Content-Type: text/plain; charset=ASCII\n"
    "Content-Transfer-Encoding: 8bit\n"
    "Plural-Forms: nplurals=2; plural=n == 0;\n"

    msgid "hello"
    msgstr "สวัสดีครับ"

    Note: ผมยังไม่ได้ดูเรื่อง header ใน po file เลย
    ใช้ค่า default ไปก่อน (ซึ่งมันก็ทำงานได้)


  • การเลือกใช้ language
    เราสามารถเลือกใช้ language ที่ต้องการได้โดย
    การสั่ง I18nService.instance.lang='th'
    โดยในตัวอย่างนี้ผมใส่ไว้ใน controller โดย check ว่ามี
    parameter ที่ชื่อ lang pass มาหรือไม่ ถ้าไม่มีก็ให้ default เป็น thai
    class MainController < ApplicationController
    def index
    lang = params[:lang]
    lang = "th" if lang == nil
    I18nService.instance.lang=lang
    end
    end


ทำเสร็จแล้ว ก็ start server ทดสอบได้เลย
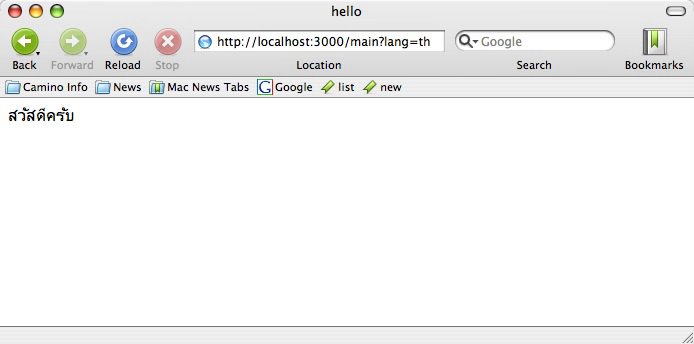
ผลลัพท์ที่ได้ก็เป็นที่น่าพอใจ


ส่วนประเด็นที่เหลือ ก็อาจจะเป็นการเรื่องการจัดการ po file
กรณีที่มีการแก้ไขเพิ่มเติม views แล้วเราสามารถ regenerate เป็นแบบ partial
ได้ไหม (อันนี้ยังไม่ได้ลองแกะดู แต่เท่าที่ลองสั่งมันมี message แปลก display ขึ้นมา)

Related link from Roti

การแสดง source code ใน Post

คุณ ohm ถามว่าเราจะแสดง xml tag, html tag ใน
post ของ blogger อย่างไร
เผอิญไม่มี email ของคุณ ohm ก็เลยขอตอบในที่นี้แล้วกัน

เริ่มแรกสุดก็คือเราจะแสดงผล xml หรือ html tag ใน post ได้อย่างไร
สมมติเราต้องการแสดงผลแบบนี้
<x>
<y>hello</y>
</x>

เวลาเราเขียน blog ก็ต้องทำการ encoding ให้เรียบร้อยก่อน
แล้วค่อยใส่ไว้ใน pre tag
หน้าตาของ post ที่จะแสดงผลเป็น xml แบบข้างบน ก็จะเขียนแบบนี้
<pre>&lt;x&gt;
&lt;y&gt;hello&lt;/y&gt;
&lt;/x&gt;</pre>


ซึ่งวิธีการทำแบบข้างบนนี้ ผมเขียน script find & replace เข้าไป editor
แล้วก็ทำ menu ไว้ เวลาจะแปลงก็เลือก highlight text ส่วนที่ต้องการ
แล้วก็เรียกใช้ script

ขั้นที่ 2 ก็คือ เกิดเราต้องการ syntax highlight หล่ะ
เราจะทำอย่างไร อันนี้ต้องหา tool เข้ามาช่วย
ผมเคย post วิธีที่ผมใช้แล้ว ลองอ่านดูนะครับ

ขั้นตอนเวลาผม post ส่วนที่เป็น source code
ผมก็จะเขียน code ลงใน jedit ก่อน
จากนั้นก็เรียกใช้ action จาก plugin ที่ผมเขียนขึ้น
ซึ่งมันจะทำการแปลง source code ให้อยู่ในรูป syntax highlight
จากนั้นก็ใส่ไว้ใน clipboard
เพื่อที่ผมจะได้ใช้คำสั่ง copy จาก clipboard ลง file ที่ต้องการได้เลย

กรณีที่คุณ ohm ไม่ถนัด java
ผมเคยใช้ perl module ที่ชื่อ vimcolor
ตัวนี้มันจะใช้ vim syntax feature ในการทำ syntax highlight

Note: กรณีต้องการ source code ของ plugin
ก็ให้ทิ้ง mail ไว้ครับ จะได้ส่งไปให้

Related link from Roti

Higher Order Messaging

อ่านเจอเรื่อง Higher Order Messaging ของ Mistaeks I hav Made
ก็เลยมาลองทำดูบ้าง เพื่อจะได้ซาบซื้งยิ่งขึ้น

ขั้นแรก ก็ต้องรู้ก่อนว่า Higer Order Message มีนิยามว่าอะไร
ถ้าตามไปดูใน paper ที่เขาอ้าง ก็จะพบประโยคนี้
Higher Order Messages allow user-defined message dispatch mechanism to be expressed using an optimally compact syntax that is a natural extension of plain messaging and also have a simple conceptual model.

คนอื่นเป็นไงไม่รู้ แต่ผมอ่านแล้ว ก็มึน
ดู definition อันนี้บ้าง
A higher order message is a message that takes another message as an "argument". It defines how that message is forwarded on to one or more objects and how the responses are collated and returned to the sender. They fit well with collections; a single higher order message can perform a query or update of all the objects in a collection.

ฟังดูง่ายขึ้นอีกนิด
ประมาณว่าเกี่ยวกับ การ update หรือ query Collections
โดยใช้กลไก forward message

ลองดูตัวอย่าง จะเห็นภาพกว่า
สมมติว่าเรามี Array ของ Class Person
ซึ่งภายในประกอบด้วย object จำนวนหนึ่ง
แล้วเราต้องการค้นหาชื่อเฉพาะบุคคลที่ยังเป็น Toddler (เด็กหัดเดิน)
(ตัวอย่างนี้ ได้รับแรงบันดาลใจจากลูกชาย)
ถ้าเขียนโปรแกรมแบบตรงเผงเลย ก็จะเขียนประมาณนี้
names = Array.new
for person in persons
if person.toddler? then
names << person.name
end
end
puts names


บรรดากูรูทั้งหลายเห็น code นี้แล้วบอกว่า ยาวไป
เห็นแล้วไม่เกิดแรงบันดาลใจ
ก็เลยไปทำการประดิษฐ์ block เข้ามาช่วย
code ข้างบนก็เลยกลายเป็น
puts persons.select { |p| p.toddler? }.collect {|p|  p.name} 


กูรูคนถัดไปเห็นแล้ว ก็บอกว่า block มันเกะกะ
อยากได้อะไรที่มันสร้างแรงบันดาลใจได้มากกว่านี้
ก็เลยเกิด Higher Order Message ขึ้น
ซึ่ง code ที่ได้จะเป็นดังนี้
puts persons.where.toddler?.extract.name


ตอนนี้ก็เลยเป็นหน้าที่ของโปรแกรมเมอร์อย่างเรา
ที่จะต้องเรียนรู้แล้วว่า HOM นั้น implement อย่างไร
จากตัวอย่างนี้ ผม implement ดังนี้ (จริงๆแล้ว ก็ลอกๆเขามานั่นแหล่ะ)

เริ่มด้วยสร้าง base class ก่อน
class HigherOrderMessage
def HigherOrderMessage.is_vital(method)
return method =~ /__(.+)__|method_missing/
end

for method in instance_methods
undef_method(method) unless is_vital(method)
end

def initialize(handler)
@handler = handler
end
end


จริงๆแล้ว class นี้จะเขียนแค่นี้ก็ได้
class HigherOrderMessage
def initialize(handler)
@handler = handler
end
end

ที่เขาใส่เพิ่มเข้ามา คงไว้ playsafe,
for loop ที่เขาใส่เข้ามาจะทำหน้าที่ block ไม่ให้ object ภายนอก
มองเห็น methods ของ HigherOrderMessage
ยกเว้นแต่ method ที่ชื่อ __send__ กับ __id__
ใครไม่รู้จัก __send__ ลองดูตัวอย่างนี้
[1,2].__send__('length') #=> 2
[1,2].length #=> 2

2 ประโยคข้างบนนั้นเท่าเทียมกัน

กลับมาดูกันต่อว่า where นั้น implement อย่างไร
class Where < HigherOrderMessage
def method_missing(id, *args)
return @handler.select {|o| o.__send__(id, *args)}
end
end

ก่อนอธิบายการทำงาน ต้องดูการนำไปใช้ก่อน
เนื่องจากเราต้องการให้ทำ persons.where ได้
แสดงว่า Array class ต้องมี method ที่ชื่อ where อยู่
ดังนันเราก็เลย declare mixin ขึ้นที่ Array class
class Array 

def where
return Where.new(self)
end

end


ซึ่งก็ใช้ได้ในตัวอย่างเรา
แต่ถ้าต้องการ generic กว่านั้นก็ควรไป declare ใน module Enumerable แทน
module นี้เป็นแหล่งรวม code ที่เกี่ยวกับ iterate collection
(ซึ่ง Array จะ include Enuerable อีกที)
module Enumerable 

def where
return Where.new(self)
end

end


การทำงาน ก็คือถ้ามีการเรียกใช้ where เมื่อไรก็ตาม ก็จะมีการ return Where object
กลับไป โดยภายใน where object จะมี handler ซึ่งเก็บ array object ไว้
และเมื่อมีการเรียกใช้ method อะไรก็ตาม (ดักโดยใช้กลไก method missing ของ ruby)
ก็จะทำการ loop collection นั้น
และ forward ชื่อ method ที่เข้ามาให้กับ object ใน collections นั้นอีกที
ในกรณีของเรา method toddler? ก็จะถูกใช้เป็นตัว screen ใน
select method

ส่วน extract ก็เขียนง่ายๆโดยใช้ collect ช่วย
class Extract < HigherOrderMessage
def method_missing(id, *args)
return @handler.collect {|o| o.__send__(id, *args)}
end
end


หลังจากลอง implement ดู แล้วย้อนกลับไปอ่าน definition อีกที
ก็พบว่า เริ่มซืมเข้าหัวมากขึ้นแล้ว

Related link from Roti

Thursday, November 03, 2005

Implement Bound properties with AspectJ

วันนี้อ่านเจอ post ของ damnhandy
ที่เขียนถึง JavaBean Aspect
โดยเขาตั้งโจทย์ว่า
เขาต้องการใช้ JGoodies เป็นตัวกลางในการ
bind hibernate persistent class เข้ากับ Swing component
ซึ่ง JGoodies Require ว่า class ที่ต้องการ bind
เข้ากับ Swing component ต้องเป็น Java Bean ที่ support
Bound properties (สามารถ add propertyChangeListener ได้)

ซึ่ง solution ที่เขาเขียนนั้นเขาใช้ JBoss AOP
วันนี้ผมก็เลยทดลองใช้ AspectJ implement ดูว่า
AspectJ สามารถทำ feature ประเภทนี้ได้ไหม

solution ของ damnhandy นั้น มี feature
พอสมควร มีการใช้ annotation เข้ามาช่วยด้วย
ผมจะตัด feature บางอันออกก่อน เพราะเราจะทำแค่
ทดลองชิม AspectJ ว่ามีรสประมาณไหนก่อน

โจทย์ที่จะทดลองทำ จะมีแค่
ในกรณีที่เรามี POJO class อยู่แล้ว
และต้องการ add feature bound properties เข้าไป
โดยใช้ AspectJ เราจะต้องทำได้อย่างไร

ในตัวอย่างของ AspectJ มีตัวอย่างเรื่องนี้อยู่แล้ว
ในหัวข้อ BoundPoint aspect
แต่เขาทำในลักษณะของ per class, per method
นั่นก็คือ ต้อง declare ทุก class, ทุก method ที่ต้องการ add bound properties
ผมก็เลยทดลอง declare ให้เป็น Generic มากขึ้นดู

สมมติว่าเรามี Class ที่ชื่อ Person
package domain;

public class Person {
private Long id;
private String name;
private String addresss;

public String getAddresss() {
return addresss;
}
public void setAddresss(String addresss) {
this.addresss = addresss;
}
public Long getId() {
return id;
}
public void setId(Long id) {
this.id = id;
}
public String getName() {
return name;
}
public void setName(String name) {
this.name = name;
}
}


เริ่มด้วย สร้าง interface ที่ชื่อ IValueObject ขึ้นมาก่อน
package domain;

import java.beans.PropertyChangeListener;

public interface IValueObject {

public void addPropertyChangeListener(
PropertyChangeListener listener);

public void addPropertyChangeListener(
String propertyName,
PropertyChangeListener listener) ;

public void removePropertyChangeListener(
PropertyChangeListener listener) ;

public void removePropertyChangeListener(
String propertyName,
PropertyChangeListener listener) ;

}


เตรียม Abstract Aspect ที่ implement method ในส่วนของ IValueObject
package domain;

import java.beans.PropertyChangeListener;
import java.beans.PropertyChangeSupport;

import org.apache.commons.beanutils.PropertyUtils;

public abstract aspect ValueObjectChangeAspect {

public PropertyChangeSupport IValueObject.support =
new PropertyChangeSupport(this);

public void IValueObject.addPropertyChangeListener(
PropertyChangeListener listener) {
support.addPropertyChangeListener(listener);
}

public void IValueObject.addPropertyChangeListener(
String propertyName,
PropertyChangeListener listener) {
support.addPropertyChangeListener(propertyName, listener);
}

public void IValueObject.removePropertyChangeListener(
PropertyChangeListener listener) {
support.removePropertyChangeListener(listener);
}

public void IValueObject.removePropertyChangeListener(
String propertyName,
PropertyChangeListener listener) {
support.removePropertyChangeListener(propertyName, listener);
}

abstract pointcut setter(IValueObject vo);

void around(IValueObject vo): setter(vo) {
String tmp = thisJoinPointStaticPart.getSignature()
.getName().substring("set".length());
String propName = tmp.substring(0, 1).toLowerCase()
+ tmp.substring(1);
try {
Object newValue = thisJoinPoint.getArgs()[0];
Object oldValue = PropertyUtils.getProperty(vo, propName);
proceed(vo);
vo.support.firePropertyChange(propName, oldValue, newValue);

} catch (Exception e) {
e.printStackTrace();
}
}

}

Aspect ValueObjectChangeAspect จะ delcare java.beans.PropertyChangeSupport instance
ที่จะไว้ใช้ช่วยทำ bound properties
โดยเราจะ declare pointcut ที่ชื่อ setter ไว้
ให้สังเกตุว่า pointcut นี้ยังเป็น abstract อยู่ นั่นก็คือว่ายังไม่มีการระบุให้ชัดว่า
จะเอาไปใช้กับ method อะไร,ที่ไหน
ในส่วนของ advice around จะ trig เมื่อ pointcut setter
ถูกเรียกใช้ ขั้นตอนการทำงาน ก็จะทำการหาค่า oldValue กับ newValue
(ใช้ common BeanUtils ของ apache เข้ามาช่วย)
เพื่อที่จะไว้ firePropertyChange
Note: โปรดระวัง code นี้ไม่สามารถใช้กับ production ได้
เพราะว่า ยังไม่ได้คิดว่า ถ้าเกิด exception แล้วจะทำอะไร


ถึงขั้นนี้ เราก็มี abstract aspect เตรียมไว้แล้ว ขั้นต่อไป ก็เป็นการ
ทำ Aspect PersonChangeAspect ที่เป็นการ implement IValueObject เข้ากับ Person Class
package domain;

public aspect PersonChangeAspect extends ValueObjectChangeAspect {

declare parents: Person implements IValueObject;

pointcut setter(IValueObject vo): call(void Person.set*(*)) && target(vo);

}

ข้างใน aspect ก็จะมีการ declare ว่าให้ Person ไป implement IValueObject เสีย
จากนั้นก็ declare pointcut setter ว่าให้ไปดักการทำงานของ
ทุก method ที่มีชื่อขึ้นต้นว่า set ใน class Person

สุดท้ายก็ทดสอบโปรแกรมดูดังนี้
package domain;

import java.beans.PropertyChangeEvent;
import java.beans.PropertyChangeListener;

public class TestRun implements PropertyChangeListener {

/**
* @param args
*/
public static void main(String[] args) {
// initialize object
Person p1 = new Person();
p1.setName("x");

IValueObject vo = (IValueObject) p1;
vo.addPropertyChangeListener(new TestRun());

p1.setName("y");
}

public void propertyChange(PropertyChangeEvent evt) {
System.out.println(evt.getPropertyName());
System.out.println(evt.getOldValue());
System.out.println(evt.getNewValue());
}

}


Output ที่ได้ ก็เป็นดังนี้

name
x
y

Related link from Roti

Wednesday, November 02, 2005

ทำไมไม่ใช้ RoR ในโปรเจคใหญ่

ผมเคย post ไว้ว่า จะเลือกใช้ RoR ในกรณีที่ project เล็กๆ
แล้วก็มี comment ถามเข้ามาว่า ทำไมถึงเลือก choice นั้น
ใช้เหตุผลด้านไหนเป็นตัวตัดสิน

วันนี้อ่านเจอ blog ของ Glenn Vanderburg
หัวข้อเรื่อง The Right Team for Rails
เขาเขียนได้ตรงใจทีเดียว

A good Rails team will consist of programmers who know what they should be doing, and usually have the discipline to do it.


The wrong Rails team is one that doesn’t understand those principles and practices. The fact that Rails makes things easy won’t be enough. In my experience, such teams expend amazing effort and ingenuity to do the wrong thing.


กรณีของผม ที่ผมวางแนวทางไว้ก็คือ
ถ้าเป็น developer มือใหม่ เข้ามาในบริษัทฯ
ผมจะยังไม่ให้ใช้ RoR เลย
จะให้หัดใช้ mvc แบบ Struts ให้เข้าใจ framework เสียก่อน
,ใช้ hibernate ได้อย่างไม่เก้อเขิน
,มอง springFramework เป็นเหมือนสวนหลังบ้าน (เปรียบเทียบเวอร์ไปนิด)
ให้ดี ก็ต้องใช้ tapestry เป็นด้วย (จะได้ซาบซื้งกับหลักการ reuse component)
แล้วก็ผ่านการพัฒนา project ด้วย java มาอย่างน้อยสัก 1 project ก่อน
คราวนี้แหล่ะที่พร้อมจะใช้ RoR ได้แล้ว
(ความหมายของคำว่า "พร้อม" นี้
หมายถึงพร้อมที่จะร่วมพัฒนาระบบงานใหญ่ๆ พร้อมๆกันเป็น team)

แก้ไขเพิ่มเติม ลืมบอกลักษณะของโปรเจคไป
โปรเจคที่ผมทำส่วนใหญ่เป็น web application ทีเป็นพวก Data Entry
มี form เยอะแยะเต็มไปหมด (ส่วนใหญ่จะ replace terminal app หรือ client-server
app ของเดิม

Related link from Roti

Tuesday, November 01, 2005

รูปจาก trip เที่ยวใต้

รูปนี้เป็นรูปอุปกรณ์จัดปลาหมึกของชาวบ้าน
ที่ปราณบุรี
(ใช้หอยร้อยเชือกเป็นสายยาว
เวลาใช้ก็ปล่อยลงไปในน้ำ
เมื่อกู้ขึ้นมา ปลาหมึกจะติดอยู่ในเเปลือกหอย)


ส่วนรูปนี้เป็นรูปปูสูงอายุ ถ้าทางจะอายุมากเชียวหล่ะ

Related link from Roti

Thursday, October 27, 2005

พักการ post

พาลูกชายกับพี่เลี้ยงเด็ก(แม่เด็ก)
ไปตลุยภาคใต้มา
8 วัน 7 คืน 1660 km.

กลับมา ก็พบว่า adsl ที่บ้านต่อไม่ได้
อาการลงแดง(อยาก net) ก็กำเริบทันที
แต่หลังจากไม่ได้ใช้ net มา 2 อาทิตย์
ตอนนี้อาการอยาก net เริ่มดีขึ้นแล้ว ไม่ทุรนทุรายแล้ว

ส่วน adsl ที่มีปัญหา เกิดจากสายโทรศัพท์มี noice รบกวน
มากเกินไป connection เลยมีปัญหา

ช่วงนี้เลยขอพักการ post ชั่วคราว

Related link from Roti

Wednesday, October 12, 2005

Link น่าสนใจ (2005-10-12)

Related link from Roti

Tuesday, October 11, 2005

LINQ

LINQ ย่อจาก Language INtegrated Query
เป็น feature หนึ่งใน .net version ใหม่

The LINQ Project is a codename for a set of extensions to the .NET Framework that encompass language-integrated query, set, and transform operations. It extends C# and Visual Basic with native language syntax for queries and provides class libraries to take advantage of these capabilities.


ดูตัวอย่าง snippet ของการใช้ LINQ
using System;
using System.Query;
using Danielfe;

class Program
{
static void Main(string[] args)
{
string[] aBunchOfWords = {"One","Two", "Hello",
"World", "Four", "Five"};

var result =
from s in aBunchOfWords // query the string array
where s.Length == 5 // for all words with length = 5
select s; // and return the string

//PrintToConsole is an Extension method that prints the value
result.Print();
}
}


integrate ได้เนียนดีมาก
ลองมาดู java บ้าง
ถ้าต้องการ feature แบบนี้ เราต้องใช้ JoSQL เข้ามาช่วย
public static void main(String[] args) throws 
QueryParseException,
QueryExecutionException {
List list = new ArrayList();
list.add("one");
list.add("two");
list.add("Hello");
list.add("world");
list.add("four");
list.add("five");

Query q = new Query();
q.parse("select * from java.lang.String " +
"where length = 5 ");
QueryResults qr = q.execute(list);
List results = qr.getResults();
for (Iterator iter = results.iterator(); iter.hasNext();) {
String tmp = (String) iter.next();
System.out.println(tmp);
}
}

เนื่องจากเป็นแค่ api ก็เลยดูไม่เนียนตาเท่า LINQ ที่เป็น language extension

Related link from Roti

Monday, October 10, 2005

Develop Rails with vim

ช่วงหลังๆนี้เริ่มทดลองเขียน ruby(rails) เยอะขึ้น
ก็เริ่มมองหา editor ที่ใช้เขียน ว่าจะใช้อะไรเขียนดี
เริ่มตั้งแต่ RDT ที่ใช้ eclipse เป็น platform
,BBEdit, JEdit
สุดท้ายสูงสุดคืนสู่สามัญ
กลับมาใช้ vi เป็น editor หลัก
มูลเหตุที่ใช้ vi ก็เพราะว่า พึ่งจะฉลาดรู้ว่า
vi ที่เป็น vim version นั้น มันมี feature แพรวพราวไม่เบาเลย
(เมื่อก่อนใช้ vi ดัั้งเดิม ใน hp เป็นหลัก
เลยไม่นึกว่าเวลาเปลี่ยน แล้ว vi จะเปลี่ยนด้วย)

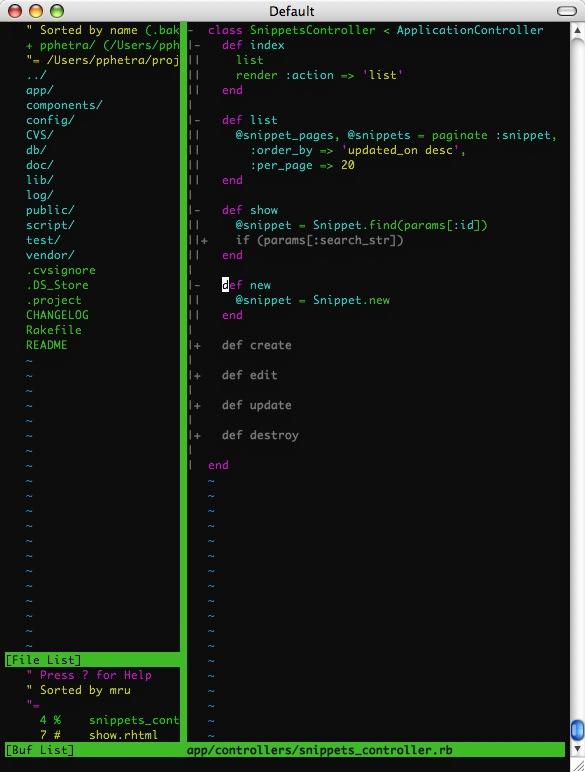
ลองมาดูว่าผมทำอะไรลงไปบ้าง เพื่อให้ใช้ vim กับ ruby
ได้อย่างสบายใจ

เริ่มดูการไป copy VimExtension จาก rubyforge ก่อน
ใน package นี้มี vim extension อยู่ 4 ส่วนคือ
  • Systax Highlighting อันนี้ไม่ต้องอธิบาย
  • Smart Indenting อันนี้ก็ไม่ต้องอธิบายเช่นเดียวกัน
  • Compiler อันนี้ช่วย map คำสั่ง make กับ error format
    ทำให้เรา run และแก้ไข error ที่เกิด ขณะอยู่ใน vim ได้


เพื่อให้ใช้งาน extension ตามข้างบน ก็ต้องมีการ
set .vimrc ดังนี้

set nocompatible " We're running Vim, not Vi!
syntax on " Enable syntax highlighting
filetype on " Enable filetype detection
filetype indent on " Enable filetype-specific indenting
filetype plugin on " Enable filetype-specific plugins


ด้วยเหตุผลอะไรก็ไม่ทราบ
(คิดว่าคงเนื่องจากไม่รู้จัก vim ดีพอมากกว่า)
ทำให้ function compiler บนเครื่องผมไม่ work
ผมก็เลยต้อง copy command ที่อยู่ใน compiler/ruby.vim
ไปไว้ใน ftplugin/ruby.vim แทน

และเพื่อให้สะดวกในการ Run
โดยให้มัน save ก่อน run
ผมก็เลยเพิ่ม map key เข้าไปดังนี้

function! RunRuby()
w
make %
endfunction

map <C-R> :call RunRuby()<CR>


ได้ข้างบนมาก็ช่วยได้ระดับหนึ่งแล้ว
ก็ต้องเพิ่มความสามารถด้วยการทำ folding
โดยกำหนด ให้ใช้ toggle การแสดง folder guild line
ส่วน tab key ก็ใช้ให้เป็นตัว toggle show/hidden fold

set fdm=syntax
set foldtext=getline(v:foldstart)
set foldcolumn=3
set fillchars=fold:\ "follow by white space
map <TAB> za

function! ToggleFoldColumn()
if &foldcolumn == 3
set foldcolumn=0
else
set foldcolumn=3
endif
endfunction
map <F3> :call ToggleFoldColumn()<CR>


จากนั้นก็ map ให้เป็น key ที่ใช้ toggle การแสดง linenumber

map :call ToggleNumber()
function! ToggleNumber()
if &number
set nonumber
else
set number
endif
endfunction


สุดท้ายก็ลง script winmanager เพื่อช่วยให้ access file
กับ switch buffer ได้ง่ายขึ้น

Related link from Roti

Sunday, October 09, 2005

บทความน่าสนใจ [2005-10-9]

  • Urban performance legends, revisited

    Pop quiz: Which language boasts faster raw allocation performance, the Java language, or C/C++? The answer may surprise you -- allocation in modern JVMs is far faster than the best performing malloc implementations.

Related link from Roti

Groovestry

Groovy เป็น script language ตัวหนึ่งที่เขียนด้วย java
เป็น script ที่น่าใช้ทีเดียว เพราะมี feature หลายอย่างที่ลอกมาจาก
ruby, python, smalltalk

วันนี้อ่านเจอใน Tapestry Mailing list ว่ามี project ที่ชื่อ Groovestry
ก็เลย load มาทดลองดู

เป็าหมายของโปรเจค ก็คือ นำ groovy เข้ามาช่วยเขียน code
ในส่วนของ Controller (MVC Pattern)
เพราะเดิมเวลาเราเขียน Web Application
เรามักจะมีขั้นตอนประมาณนี้
  1. start tomcat
  2. ใช้ browser เรียกทดสอบ programe
  3. โปรแกรมทำงานไม่ถูกต้อง
  4. แก้ไขโปรแกรม
  5. reload application
  6. วนกลับไปทำขั้นตอนที่ 2

ขั้นตอนที่น่าเบื่อ ก็คือตอนที่รอมัน reload application
ถ้า project ใหญ่ๆ มันจะช้าจนน่ารำคาญ
แน่นอน ถ้าทำ test case ไว้ดี ก็จะลดรอบ
ของการ iterate แบบที่ว่าไปได้เยอะ
แต่บางที เราก็อยากเขียนโปรแกรม
ในแบบของศิลปินบ้าง เขียนไป ดูผลลัพท์ไป ออกแบบไป
เหมือนช่างปั้น ที่ค่อยๆใส่ดินเข้าไป ตัดออก โปะเข้าไปใหม่ เกลี่ย ปาด..
(สำหรับคนที่ใช้ framework อื่น
tapestry ใช้วิธี dynamic enhance class
ในตอนที่ load controller ขึ้นมาทำงาน
ทำให้เราไม่สามารถใช้ feature reload class
ของ tomcat ได้)

เมื่อนำ Groovestry เข้ามาใช้
รอบ cycle การพัฒนาของเราก็จะเร็วขึ้น
เพราะสามารถตัดขั้นตอน การ reload application ออกไปได้

การใช้ Groovestry ก็ง่ายดาย
เพียงแค่ add jar เข้าไปใน WEB-INF/lib
แล้วก็กำหนดให้ page class เป็น ScriptPage
<page-specification class="org.apache.tapestry.contrib.script.ScriptPage">

เมื่อกำหนดแบบนี้แล้ว เวลา controller ถูกเรียกใช้งาน
มันก็จะมองหา groovy file ที่มีชื่อเดียวกับ page แต่มีนามสกุลเป็น
.groovy ให้เอง

ตัว controller ที่เขียนด้วย groovy จะมีหน้าตาประมาณนี้
package application.script

import org.apache.tapestry.contrib.script.ScriptObject

class Home extends ScriptObject {

void pageBeginRender(event) {
.....
}

public void submit(cycle) {
page2 = cycle.getPage("Page2");
page2.title = "< " + formTitle + " >";
page2.customerId = customerId;
cycle.activate(page2);
}
}

โดย script ของเราจะ extend จากScriptObject
(จริงๆไม่ extend ก็ได้ แต่จะขาด feature ของการ access
component, page property ไป)

เวลาใช้งานใน mode develope ก็ให้ set flag
-Dorg.apache.tapestry.disable-caching=true ด้วย
เพื่อไม่ให้ tapestry ทำ template-caching

หลังจากลองใช้ไปสักพักหนึ่ง
ก็พบว่า Groovestry มันขาด feature หนึ่งของ
tapestry ไป
feature ที่ว่า ก็คือการ binding ระหว่าง component กับ controller
ในลักษณะ ognl Expression
ยกตัวอย่าง
สมมติเรามี dynamic title อยู่อันหนึ่ง
<title>
<span jwcid="@Insert" value="ognl:title">xxx</span>
</title>

ถ้าเรา implement Controller ด้วย Java
เราก็ต้องมี method getTitle
ที่จะถูก bind เข้ากับ component Insert ใน html template
public class MyPage extends BasePage {
...
public String getTitle() {
return "my page title";
}
....
}

แต่พอมาใช้ Groovestry ก็พบว่าไม่สามารถ
เรียกข้ามไปใช้ method getTitle ที่เขียนไว้ใน groovy controller ได้
หลังจากแกะ code ดูสักพัก
ก็พบว่า จริงๆแล้ว มันพอที่จะทำได้เหมือนกัน
แต่ต้องแก้ code จำนวนหนึ่ง

สุดท้าย feature ที่เพิ่มเข้าไป ก็ทำให้สามารถเรียกใช้ ในลักษณะนี้ได้
<title>
<span jwcid="@Insert"
value="ognl:doAction('getTitle')">xxx</span>
</title>

ดูไม่ค่อยเนียนตานัก แต่ก็ทำงานได้
(java มันขาด feature แบบ ruby ที่สามารถ
implement missing method handler ได้
ไม่งั้น เราก็สามารถทำ dynamic method ได้เนียนกว่านี้)

Related link from Roti

JBI Interface Name & Service Name

ในการ implement JBI component
จะมีศัพท์พื้นฐานที่ต้องทำความเข้าใจอยู่จำนวนหนึ่ง
ไม่เช่นนั้นอาจจะต้องปวดหัวกับการ ส่ง message ไม่ได้
หรือ message วิ่งหายต๋อมไม่รู้ไปไหน

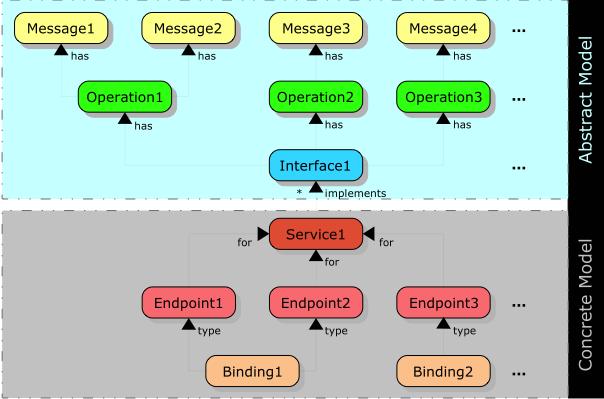
ศัพท์ตัวแรกก็คือคำว่า interface
เป็นศัพท์ที่ define ไว้ใน spec ของ WSDL 2.0
มีความหมายเดียวกับ คำว่า porttype ใน spec WSDL 1.1
10 ปากว่า ไม่เท่าตาเห็น
ลองดู WSDL 1.1 ของ google ดู
<portType name="GoogleSearchPort">

<operation name="doGoogleSearch">
<input message="typens:doGoogleSearch"/>
<output message="typens:doGoogleSearchResponse"/>
</operation>

</portType>

ถ้าเปรียบเทียบกับ OOP term
interface ใน WSDL 2.0 ก็มีความหมายเหมือนกัน interface ใน OOP

ศัพท์ตัวถัดไปก็คือ service
ความหมายก็คือ implementation ของ interface นั่นเอง

ศัพท์ตัวถัดไปก็คือ endpoint
endpoint คือจุดที่เกิดการเชื่อมต่อจริงๆ
คล้ายๆความหมายของ port ในเรื่อง socket (network)
ลองดูความหมายที่ WSDL 2.0 define ไว้ (JBI endpoint มีความหมายเดียวกับ WSDL endpoint)
Endpoints, in WSDL 2.0, refer to a particular address, accessible by a particular protocol, used to access a
particular service


ความสัมพันธ์ระหว่าง service กับ endpoint เป็น one-to-many ก็คือ
service หนึ่งๆมี endpoint ได้หลาย endpoint

เวลาเราส่ง Message ใน JBI
เราสามารถระบุ target ที่จะส่งได้ 2 วิธีคือ
  • ระบุแค่ service name
    ถ้าระบุแค่นี้ ตัว JBI container จะตัดสินให้ว่า ควรจะส่งให้ endpoint ไหนดี
  • ระบุทั้ง service name และ endpoint name (มีศัพท์เรียกว่า service endpoint)


ที่นี้ลองดูที่ jbi.xml จริงๆบ้าง
<services binding-component="false"
xmlns:logger="http://pok/dblogger/">
<provides interface-name="logger:log-interface"
service-name="logger:log"/>
</services>

source ข้างบนก็คือ การ define service ของ provider
จะเห็นว่ามีการระบุ interface-name กับ service-name

ถ้าเราไปดู source code ของ Java Class ที่ implement service นี้
public class DbLoggerComponent implements 
ServiceInterfaceImplementation,
ServiceEndPointImplementation {

public QName getInterfaceName() {
return new QName("http://pok/dblogger/",
"log-interface");
}

public void onMessage(MessageExchange msg) {
...
}
}

จะเห็นว่ามี method ที่ชื่อ getInterfaceName

เวลาเราเขียน component ใน servicemix
เราสามารถเลือกวิธีเขียนได้ 2 วิธีคือ
  • implment interface ของ JBI-api ด้วยตนเอง
  • ใช้ client-api ของ ServiceMix
    อันนี้จะสะดวกสบายขึ้นหน่อย จำนวนบรรทัดของ source code
    ที่เขียน จะลดลงหน่อย


ในที่นี้เราจะพูดถึงการเขียน component แบบที่ใช้ client-api เท่านั้น
เริ่มโดย เวลาเราเขียน component เราก็จะเขียน class ที่ implement
interface ServiceInterfaceImplementation
ซึ่งใน interface นี้จะบังคับให้เรา implement method ที่ชื่อ
getInterfaceName
ส่วน service name และ endpoint name
คงจะใช้การ lookup จาก jbi.xml

กรณีที่เรามี endpoint มากกว่า 1 endpoint ใน 1 service
การ implement แค่ ServiceInterfaceImplementation
จะไม่เพียงพอ ต้องมีการ implement ServiceEndPointImplementation
interface นี้จะบังคับเราให้เรา implement method getServiceName
กับ getEndpointName

Related link from Roti

Wednesday, October 05, 2005

ServiceMix Component

คราวก่อนทดลอง deploy component ด้วยการ wire เข้าไปใน container ตรงๆ
คราวนี้ได้ทดลอง deploy แบบ Hot deploy ดูบ้าง (ประเภทที่เอา zip file ไปวาง
ไว้ใต้ directory ที่กำหนด)

มี tutorial ที่พูดถึงเรื่องนี้อยู่ที่นี่
Develop JBI Component with Spring Client Toolkit

ทดลองทำตามแล้วไม่ได้ผลลัพท์ตามที่เขาว่าไว้
หลังจากนั่งมั่วอยู่ครึ่งวัน ก็ได้ข้อสรุปดังนี้

  • set Environment Variable SERVICEMIX_HOME
  • เวลาเรียกใช้งานให้เรียกใช้งาน program ที่ root path (/)
  • แก้ไข shell script $SERVICEMIX_HOME/bin/servicemix
    เปลี่ยนชื่อ path ต่างๆที่อยู่ข้างในให้เป็นชื่อเต็ม
  • เรียกใช้งานโดยระบุ configuration file เข้าไปด้วย
    $SERVICEMIX_HOME/bin/servicemix $SERVICEMIX_HOME/conf/servicemix.xml


การพัฒนา JBI Component นั้น
servicemix หลีกเลี่ยงขั้นตอนยุ่งยากทั้งหลาย
โดยการห่อ component ของเราไว้ใต้ SpringComponent
(สงสัยเหมือนกันว่าวิธีนี้จะนำไป deploy ใน JBI Container ตัวอื่นได้หรือเปล่า
แต่ขี้เกียจลอง)

Component ที่เรา deploy สามารถประพฤติตนได้ 2 แบบ
คือเป็น provider หรือเป็น consumer
provider คือ component ที่มีบริการให้เรียกใช้
ส่วน consumer คือ component ที่เรียกใช้บริการ
component หนึ่งๆ สามารถเป็นได้ทั้ง consumer และ provider

ตามตัวอย่าง tutorial ข้างบน จะเป็นการทำ component
TimerComponent กับ LoggerComponent
TimerComponent จะส่ง message ออกมา
ส่วน loggerComponent ถ้าได้รับ message ก็จะแสดงผลออกมาที่ console


เวลาเรา config component ฝั่ง provider เราจะประกาศ xml ดังนี้
<services binding-component="false"
xmlns:logger="http://pok/logger">
<provides interface-name="logger:log"
service-name="logger:myLogger"/>
</services>

จะเห็นว่า LoggerComponent ประกาศตัวเองว่า เป็น service ที่ชื่อ QName("http://pok/logger", "myLogger")
และมี interface ที่ชื่อ QName("http://pok/logger", "log")
Note: สงสัยเหมือนกันว่า 1 service มีได้มากกว่า 1 interface หรือเปล่า ?

ส่วน ฝั่ง consumer จะ ประกาศ xml ดังนี้
<services binding-component="false"
xmlns:logger="http://pok/logger">
<consumes interface-name="logger:log"
service-name="logger:myLogger"/>
</services>

สังเกตุว่า TimerComponent จะบอกว่าตัวเองต้องการใช้ service อะไร
และ interface ชื่ออะไร

จะเห็นว่าทั้งคนส่งและคนรับ จะรู้จักกันผ่านทางชื่อ interface และ ชื่อ service เท่านั้น
การแยก dependency ออกจากกันแบบนี้ เป็น key หลัก key หนึ่งของ SOA
(service oriented architecture)
การระบุชื่อแบบนี้ JBI เรียก End Point

ลักษณะการส่งของ Tutorial นี้ เป็นแบบ Explicitly นั่นคือ
ผู้ส่งกำหนดเองว่าต้องการส่งให้ใคร
ใน Spec JBI นั้น วิธีการระบุ End Point สามารถทำได้อีก 2 วิธีคือ
  • Implicitly ผู้ส่งจะระบุประเภทของ service อย่างเดียว ตัว NMR เลือกหาให้เอง
    (เบื้องหลังคือ NMR จะส่งคำถามไปยัง component ทีอยู่ในข่ายว่าเป็น candidate
    ว่าจะ accept ไหม)
  • dynamically อันนี้อ่านแล้วไม่่ค่อยเข้าใจ
    เดาๆว่า provider จะสร้าง vocabulary ชุดหนึ่งที่อธิบายถึง service ของตัวเอง
    ซึ่ง vocabulary พวกนี้ consumer สามารถ query ไปดูได้
    และ consumer ก็เลือกเอาว่าจะส่งให้ provider


ถ้าเราดู source code ของ TimerComponent ในส่วนของการส่ง
InOnly inOnly = serviceContext.createInOnly(new QName(
"http://pok/logger", "log"));
NormalizedMessage message = inOnly.createMessage();
message.setContent(new StreamSource(new StringReader(
"<hello>world</hello>")));
serviceContext.done(inOnly);

จะเห็นว่ามีการใช้ Object ที่ชื่อ InOnly
ลักษณะการส่ง Message ใน JBI จะแยกเป็น 4 แบบ คือ
  • One-Way หลังจากส่งไปแล้ว ผู้ส่งจะไม่รู้เลยว่า คนรับสามารถ process message ได้หรือไม่
    อันนี้ใช้ Class InOnly ในการส่ง)
  • Reliable One-Way ผู้รับสามารถแจ้ง fault กลับไปยังผู้ส่งได้ ในกรณีที่ไม่สามารถ process message ได้
    อันนี้ใช้ Class RobustInOnly ในการส่ง
  • Request-Response อันนี้ผู้ส่งคาดหวังที่จะได้ผลลัพท์ จากผู้ให้บริการ
    ใช้ Class InOut ในการส่ง
  • Request Optional-Response อันนี้พิสดารหน่อย
    อธิบายยาก ต้องลองเปิดดู diagram ใน JBI Specification
    แล้วจะร้องอ๋อ (แบบงงๆ ว่าทำไมมันต้องทำแบบนี้ด้วยวะ)

Related link from Roti