Thursday, July 14, 2005

FaceAnalyzer

เป็น site ที่เปิดให้เรา submit หน้าเราเข้าไป
จากนั้นก็จะใช้ facial recognition technology
ทำการวิเคราะห์ personality ของเรา

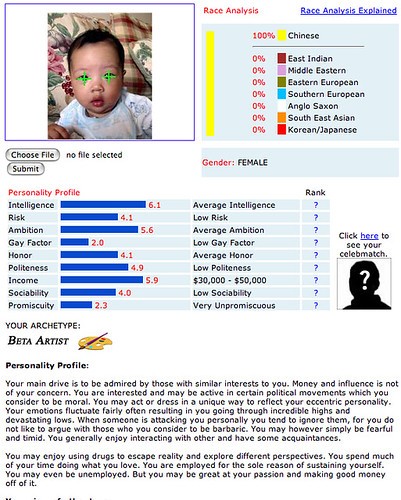
เพื่อให้หายข้องใจ ก็เลยจัดการส่งรูปลูกสุดที่รักไปทดสอบ
ผลการวิเคราะห์ได้ออกมาดังนี้
face analyzer of pann

Race Analysis น่าเชื่อถือมาก
เพราะลูกผมมันหน้าตี๋ (ถึงหน้าพ่อมันจะเหมือนพวกทมิฬก็เถอะ)
ส่วน Gender นั้นทายผิด (อันนี้ก็น่าจะผิดอยู่หรอก
เพราะ คนทั่วไปเวลาเห็นหน้าลูกผม
ก็เกิดความไม่แน่ใจเหมือนกันว่า ผู้ชายหรือผู้หญิง)

ใครสนใจลองส่งรูปตัวเองเข้าประกวดก็ลองดู
(เดี๋ยวจะแอบส่งรูปแฟนเข้าวิเคราะห์สักหน่อย)

Related link from Roti

Wednesday, July 13, 2005

Request xml output from rails

วันนี้ได้ทดลองเขียน rails ให้ response เป็น xml content
สรุปวิธีการได้ดังนี้

โจทย์
เราจะลองสร้าง web application ที่ provide
ข้อมูล contact ให้กับผู้ร้องขอ โดยให้ format
กลับมาเป็น xml

  • สร้าง application
    โดยใช้คำสั่ง
    rails contactApp

    ซึ่งเป็นการสร้าง framework structure ขึ้นใน
    directory contactApp

  • สร้าง controller สำหรับรับ request

    ให้ cd ไปยัง directory contactApp ที่ rails generate ให้
    จากนั้นสั่งสร้าง controller
    ruby script/generate controller xml

    จะได้ file xml_controller.rb ใน directory app/controllers

  • implement action
    ในที่นี้จะลองสร้าง action ที่ชื่อ list
    ซึ่งทำหน้าที่แสดงรายการ contact ทั้งหมดกลับไปในรูป xml
    class XmlController < ApplicationController
    def list
    @contacts = Contact.find_all
    @headers["Content-Type"] = "text/xml; charset=utf-8"
    render :action=>'list', :layout => false
    end
    end

    step การทำงานก็คือ select ข้อมูล
    ทั้งหมดของ contact ขึ้นมาจาก database
    ใส่ไว้ใน class attribute ที่ชื่อ contacts

    จากนั้นก็ set content-type ของ response
    ให้เป็น text/xml

    สุดท้ายก็ dispatch ไป render โดยใช้ view ที่ชื่อ list
    โดยระบุไม่ให้ layout component ทำงาน
    (layout จะทำหน้าที่ generate ส่วนที่
    ใช้ซ้ำๆกันใน view เช่น พวก header, footer
    ของ page)

  • สร้าง view ที่ชื่อ list.rxml
    สังเกตุว่านามสกุลเป็น rxml เนื่องเป็น
    template ที่ช่วยในการ generate xml
    (template นี้ใช้ builder module
    ในการ generate xml)

    ภายใน list.rxml มีเนื้อหาดังนี้
    xml.instruct! :xml, :version=>"1.0"
    xml.contacts do
    @contacts.each do |contact|
    xml.contact(:name=>contact.name, :email=>contact.email)
    end
    end


ทดลองเรียกใช้งาน
โดยส่ง request ไปยัง url "http://host:port/xml/list"
(เป็นการเรียกใช้ action list ที่อยู่ใน xml controller)
ผลลัพท์ที่ได้
<?xml version="1.0" encoding="UTF-8"?>
<contacts>
<contact name="polawat phetra" Email="pphetra@x.hotmail.com"/>
<contact name="prapapan phetra" Email="cprapapan@y.yahoo.com"/>
<contact name="pann phetra" Email="pann@pokhome.com"/>
</contacts>

Related link from Roti

remove rails cache

วันนี้ upgrade Rails
ปรากฎว่าเกิด error
undefined method `discard' for {}:Hash

ค้น internet พบว่าต้อง clear session
โดยใช้คำสั่ง
sudo rm /tmp/ruby*

Related link from Roti

config pooling ใน Spring Framework

ส่วนใหญ่เรามัก implement service layer
(หรือ business logic layer)
ในลักษณะ Singleton ซึ่งหมายความว่า
method ของเรา implement เป็น Thread-safe

แต่มีบางครั้งที่ design ของเราออกมาในรูป
ของ non-thread-safe service object
ในกรณีเรามักจะ implement มันในรูปของ object pool
เพื่อลดเวลา create object (initial resources)
(รวมทั้งลด Object ที่ต้องถูก garbage collection ลงด้วย)

วิธีการ config pooling ใน Spring
สามารถทำผ่าน ProxyFactoryBean ได้
โดยการ set targetSource

สมมติเรามี Class NonThreadSafeService

public class NonThreadSafeService {
public void callMe() {
..
}
}


ขั้นแรกให้ define ใน spring configuration ดังนี้
<bean id="ntsService" class="NonThreadSafeService"
singleton="false"/>


จากนั้นก็ใช้ CommonsPoolTargetSource เข้ามาห่อไว้
<bean id="poolTargetSource" 
class="org.springframework.aop.target.CommonsPoolTargetSource">
<property name="targetBeanName"><value>ntsService</value></property>
<property name="maxSize"><value>25</value></property>
</bean>


สุดท้ายก็ห่อด้วย AOP Proxy
<bean id="nts"
class="org.sprfr.aop.framework.ProxyFactoryBean">
<property name="targetSource"
ref="poolTargetSource"/>
</bean>


ชอบตรงที่เป็นการแก้ไขที่ configuration เพียงที่เดียว
ก็ได้ feature pooling แล้ว
โดยไม่ต้องไปแตะ code ในส่วนที่เรียกใช้ service เลย

Related link from Roti

Good Experience Games

Signal vs. Noise แนะนำ site ที่น่าสนใจ
Good Experience Games
ลองเข้าไปเล่นดูแล้ว
มีแต่ game ที่น่าสนใจทั้งนั้น
เช่น
Planarity
อันนี้ชอบความ simple ของมัน

Loop
อันนี้ชอบ interface

Related link from Roti

Bézier curves

อ่านเจอเรื่องนี้ Bézier curves
It is attributed and named after a French engineer, Pierre Bézier, who used them for the body design of the Renault car in the 1970's. They have since obtained dominance in the typesetting industry and in particular with the Adobe Postscript and font products.


ก็เลยลอง implement ด้วย java ดู
/*
* DrawPanel.java
*
* Created on July 9, 2005, 9:12 AM
*
*/

package curve;

import java.awt.Color;
import java.awt.Graphics;
import java.awt.geom.Point2D;
import java.util.ArrayList;
import java.util.List;
import javax.swing.JPanel;

/**
*
* @author pphetra
*/
public class DrawPanel extends JPanel {
private static int LOOP_COUNT = 60;

protected void paintComponent(Graphics g) {
super.paintComponent(g);
ArrayList points = new ArrayList();
points.add(new Point2D.Double(0.0, 200.0));
points.add(new Point2D.Double(50.0, 50.0));
points.add(new Point2D.Double(100.0, 150.0));
points.add(new Point2D.Double(200.0, 0.0));

paintBazier(g, points, LOOP_COUNT);

paintControlPoints(g, points);

}

private void paintControlPoints(Graphics g, List points) {
g.setColor(Color.MAGENTA);
Point2D.Double oldp = null;
for (int i = 0; i < points.size(); i++) {
Point2D.Double p = (Point2D.Double) points.get(i);
if (oldp != null) {
g.drawLine((int) oldp.x, (int) oldp.y, (int) p.x, (int) p.y);
}
oldp = p;
}


}

private void paintBazier(Graphics g, List points, int loopCount) {
Point2D.Double oldp = null;

for (int i = 0; i < loopCount; i++) {
Point2D.Double p = bazier(points, points.size()-1, (double) i/ (doub
le) loopCount);
if (oldp == null) {
oldp = p;
}
g.drawLine((int) p.x, (int) p.y, (int) oldp.x, (int) oldp.y);
oldp = p;
}
Point2D.Double p = (Point2D.Double) points.get(points.size()-1);

g.drawLine((int) oldp.x, (int) oldp.y, (int) p.x, (int) p.y);
}

private Point2D.Double bazier(List points, int n, double mu) {

int k, kn, nn, nkn;
double blend, muk, munk;
Point2D.Double b = new Point2D.Double(0.0, 0.0);

muk = 1;
munk = java.lang.Math.pow(1-mu, n);

for (k = 0; k <= n; k++) {
nn = n;
kn = k;
nkn = n-k;
blend = muk * munk;
muk *= mu;
munk /= (1-mu);
while (nn >= 1) {
blend *= nn;
nn--;
if (kn > 1) {
blend /= (double) kn;
kn--;
}
if (nkn > 1) {
blend /= (double) nkn;
nkn--;
}

}
Point2D.Double p = (Point2D.Double) points.get(k);
b.x += (p.x * blend);
b.y += (p.y * blend);
}

return b;
}
}


ได้ผลลัพท์ดังนี้


ในโปรแกรม จะเห็นว่ามีค่า LOOP_COUNT อยู่ตัวหนึ่ง
ค่านี้ก็คือจำนวน line segment ที่ใช้ draw curve
ปัญหาก็คือ ควรใช้ค่าเท่าไรดี
น้อยไป ก็ไม่โค้ง
มากไป ก็เปลือง
ก็เลยมีบทความ Adaptive Subdivision of Bezier Curves

Related link from Roti

Monday, July 11, 2005

ทดลอง google map api ใน blogspot

วันนี้ผมทดลองสมัครเข้าใช้บริการ google map api
โดย google map api ยอมให้ใช้ api
เฉพาะใน web site ที่สมัครเข้าใช้งานเท่านั้น
อย่างของผม ก็สมัครใช้ api
กับ url http://pphetra.blogspot.com
ได้ key ยืดยาวมาชุดหนึ่ง

เริ่มแรก ก็คือเราต้อง include api ในส่วน header ของ web page

<script src="http://maps.google.com/maps?file=api&v=1&key=abcdefg" type="text/ja
vascript"></script>

จากนั้นก็กำหนดบริเวณ render map ด้วย div block

<div id="mymap" style="width: 400px; height: 400px"></div>


ทำการ new GMap Object ขึ้นมาด้วย javascript
if (GBrowserIsCompatible()) { 
var map = new GMap(document.getElementById("mymap"));
map.addControl(new GSmallMapControl());
map.addControl(new GMapTypeControl());
map.setMapType(_SATELLITE_TYPE);
map.centerAndZoom(new GPoint(99.003489, 18.788563), 1);
}

Note: ค่า map type _SATELLITE_TYPE นั้นไม่ตรง
กับ api spec ซึ่งมีค่าเป็น G_SATELLITE_TYPE
ลองใช้ G_SATELLITE_TYPE แล้วทำงานไม่ถูกต้อง

ตัวอย่าง GPoint ที่ทดลองให้ดูนี้เป็นค่า latitude, longitude ของเมืองเขียงใหม่
บริเวณตลาดวโรรส
ถ้าใช้ google map ดู ก็จะมี url แบบนี้
http://maps.google.com/maps?ll=18.788563,99.003489&spn=0.008898,0.005922&t=k&hl=en

Note: ค่า latitude, longitude ใน url กับใน constructor ของ GPoint เรียงลำดับต่างกัน

จะเห็นได้ว่าวิธีใช้ google map Api นั้นง่ายๆ
แต่ประเด็นปัญหาก็คือ
เราไม่สามารถใส่ javascript
ลงไปใน post ของเราได้
(editor ของ blogger จะไม่ยอมให้เราใส่ tag javascript)
ก็เลยเดือนร้อนต้องหาวิธีการ embed javascirpt
ลงไปตอน post ให้ได้

วิธีการที่ใช้ก็คือ ห่อ javascript ที่ต้องการ
ลงไปใน div tag (โดยกำหนด style เป็น display:none)
จากนั้น ณ จังหวะที่ onload ของ page
ก็จัดการ scan หา div tag นัั้นๆ
แล้วก็สั่ง eval เจ้า javascript เสีย
function embedjs() {
var xs = document.getElementsByTagName("div");
var k = xs.length;
var maps = new Array(12);
var j = 0;
for (var i = 0; i < k; i++) {
if (xs[i].getAttribute("id") == "pokmap") {
maps[j++] = xs[i].innerHTML;
}
}

for (var i = 0; i < j; i++) {
eval(maps[i]);
}
}

Note : ให้ระวังอย่ายุบรวม for loop
scan กับ for loop evel เข้าด้วยกัน
เพราะว่าเมื่อเราเรียกเจ้า google map api
จะเกิดการ insert div ใหม่เข้ามา ผลลัพท์ก็คือ
จะเกิดวน loop ไม่รู้จบ

แก้ไขส่วน template เพิ่ม onload event
<body onload="embedjs()">


จากนั้นเวลา post ก็สามารถใส่ tag
ได้ดังนี้
<div id="123map" style="width: 400px; height: 400px">
</div>
<div id="pokmap" style="display: none;">if (GBrowserIsCompatible()) { var map =
new GMap(document.getElementById("123map")); map.addControl(new GSmallMapContro
l()); map.addControl(new GMapTypeControl()); map.setMapType(_SATELLITE_TYPE); ma
p.centerAndZoom(new GPoint(99.003489, 18.788563), 1);}</div>

ผลลัพท์ที่ได้ก็เป็นเช่นนี้


Related link from Roti

google map mania

ตั้งแต่รู้จาก คุณ Hui ว่า google map สามารถแสดง
ภาพของกรุงเทพได้แล้ว ก็เลยเกิดความสนุกในการใช้งาน

วันนี้เจอ link นี้เข้า
Google Maps Mania
เป็น blog ที่รวมสารพัดเรื่องที่เกี่ยวข้องกับ google map

มีบางอันเห็นแล้วอมยิ้ม
เช่น Scavengeroogle
เปิดให้เล่นเกมส์ตามล่า สถานที่ที่ post ว่าอยู่ที่ไหน

Related link from Roti

บทความน่าสนใจ

เห็นใน blog ของคนอื่นลง link ไว้ (เจอ 2 blog แล้วที่พูดถึงเรื่องนี้)
ก็เลยตามไปอ่านดู ค่อนข้างยาว
แต่พอจะอ่านข้ามได้
เพราะหลักการค่อนข้างเป็นที่รู้กันอยู่

Unskilled and Unaware of It: How Difficulties in Recognizing One's Own Incompetence Lead to Inflated Self-Assessments

quote มาให้ดูบางส่วนแล้วกัน
(เป็นหนูทดลองให้ bact เขาหน่อย
ว่า การ quote ถือเป็นการตัวแทนของ
ใจความสำคัญของเนื้อหาได้หรือไม่)
People tend to hold overly favorable views of their abilities in many social and intellectual domains.
Across 4 studies, the authors found that participants scoring in the bottom quartile on tests of humor, grammar, and logic grossly overestimated their test performance and ability. Although their test scores put them in the 12th percentile, they estimated themselves to be in the 62nd.


"above-average effect,"
the tendency of the average person to believe he or she is above average.
For example, high school students tend to see themselves as having more ability in leadership, getting along with others, and written expression than their peers
, business managers view themselves as more able than the typical manager
, and football players see themselves as more savvy in "football sense" than their teammates


"ignorance more frequently begets confidence than does knowledge"
Charles Darwin


ปล. เรื่องนี้สามารถ apply เข้ากับบรรดาท่านผู้ใหญ่ในบ้านเมืองนี้
ได้หลายท่านเลย

Related link from Roti