Thursday, January 05, 2006

args4j - Command Line Argument with Annotaion

args4j
หนุ่มญี่ปุ่นคนนี้มี idea ในการเอา Annotaion มาใช้ได้เหมาะมาก
ลองดูตัวอย่าง code เขา
import org.kohsuke.args4j.Argument;
import org.kohsuke.args4j.CmdLineException;
import org.kohsuke.args4j.CmdLineParser;
import org.kohsuke.args4j.Option;

import java.io.File;
import java.io.IOException;
import java.util.ArrayList;
import java.util.List;


/**
* Sample program that shows how you can use args4j.
*
* @author
* Kohsuke Kawaguchi (kk@kohsuke.org)
*/
public class SampleMain {

@Option(name="-r",usage="recursively run something")
private boolean recursive;

@Option(name="-o",usage="output to this file",metaVar="OUTPUT")
private File out = new File(".");

@Option(name="-str") // no usage
private String str = "(default value)";

@Option(name="-n",usage="repeat <n> times\nusage can have new lines in it an
d also it can be verrrrrrrrrrrrrrrrrry long")
private int num = -1;

// receives other command line parameters than options
@Argument
private List<String> arguments = new ArrayList<String>();

public static void main(String[] args) throws IOException {
new SampleMain().doMain(args);
}

public void doMain(String[] args) throws IOException {
CmdLineParser parser = new CmdLineParser(this);

try {
// parse the arguments.
parser.parseArgument(args);

// you can parse additional arguments if you want.
// parser.parseArgument("more","args");

// after parsing arguments, you should check
// if enough arguments are given.
if( arguments.isEmpty() )
throw new CmdLineException("No argument is given");

} catch( CmdLineException e ) {
// if there's a problem in the command line,
// you'll get this exception. this will report
// an error message.
System.err.println(e.getMessage());
System.err.println("java SampleMain [options...] arguments...");
parser.printUsage(System.err);
return;
}

// this will redirect the output to the specified output
System.out.println(out);

if( recursive )
System.out.println("-r flag is set");

System.out.println("-str was "+str);

if( num>=0 )
System.out.println("-n was "+num);

// access non-option arguments
System.out.println("other arguments are:");
for( String s : arguments )
System.out.println(s);
}
}


เทียบกับ jakarta common CLI
// create the command line parser
CommandLineParser parser = new PosixParser();

// create the Options
Options options = new Options();
options.addOption( "a", "all", false, "do not hide entries starting with ." );
options.addOption( "A", "almost-all", false, "do not list implied . and .." );
options.addOption( "b", "escape", false, "print octal escapes for nongraphic "
+ "characters" );
options.addOption( OptionBuilder.withLongOpt( "block-size" )
.withDescription( "use SIZE-byte blocks" )
.withValueSeparator( '=' )
.hasArg()
.create() );
options.addOption( "B", "ignore-backups", false, "do not list implied entried "
+ "ending with ~");
options.addOption( "c", false, "with -lt: sort by, and show, ctime (time of last
"
+ "modification of file status information) with
"
+ "-l:show ctime and sort by name otherwise: sort
"
+ "by ctime" );
options.addOption( "C", false, "list entries by columns" );

String[] args = new String[]{ "--block-size=10" };

try {
// parse the command line arguments
CommandLine line = parser.parse( options, args );

// validate that block-size has been set
if( line.hasOption( "block-size" ) ) {
// print the value of block-size
System.out.println( line.getOptionValue( "block-size" ) );
}
}
catch( ParseException exp ) {
System.out.println( "Unexpected exception:" + exp.getMessage() );
}

Related link from Roti

My GTD (Get Thing Done)

ปีนี้ผมตั้งเป้าว่าจะต้องควบคุมวินัยตัวเองในการทำงานให้ได้
เนื่องจากทำงานอยู่ที่บ้าน มันมีอะไรให้วอกแวกได้เต็มไปหมด
ตอนนี้ ขั้นตอนที่นำมาใช้ ก็ประกอบด้วย

  1. การจัด Desktop ของตัวเอง
    อันนี้ได้ idea มาจากเรื่องที่ Martin Ternouth เขียนไว้ใน message board
    "Thinking and Paper"
    ตอนนี้ desktop ผมจะเหลือ folder อยู่ 4 อันคือ
    • Work in Progress
      อันนี้ใช้เก็บแฟ้มงานที่กำลังทำอยู่
    • Postpone
      เจออะไรดีๆ แต่ยังไม่มีเวลาจัดการ ก็ยัดใส่แฟ้มนี้ไว้
    • Culling
      อันนี้ไว้ใส่ พวกรอกำจัด
    • Reference
      ใช้เก็บพวก cheat sheet หรือ Reference Manual ที่ใช้บ่อยๆ

    ทุกวันเวลาเจออะไรที่น่าสนใจ ก็ลากมาวางไว้ใน Desktop
    ทุกสิ้นวัน ก็พยายามกำจัดพวกที่ระเกะระกะออกให้เหลือแต่
    folder ที่ระบุข้างบน

  2. ตอนเช้า (จริงๆต้องใช้คำว่าตอนสาย)
    เริ่มต้นใช้ computer ก็ set todo list ก่อนเลย ว่าต้องทำอะไรบ้าง
    จะใช้เวลาเท่าไร


  3. โปรแกรมจับเวลา
    ใช้จับเวลา จะได้ลง log ในข้อ 2. ได้


  4. สำหรับโปรเจค สำคัญแต่ไม่เร่งด่วน
    ใช้ Trac เข้ามาช่วยจัดการ
    ทั้งส่วน design ที่ทำใน wiki และก็ส่วน milestone กับ ticket
    ที่ใช้วัดความก้าวหน้า


Note: บทความนี้เหมาะ สำหรับคนประเภท Horizontally Organized

I am a horizontal organizer. When I put something in a file, I never see it again.

Related link from Roti

Google Search History - Trend

พึ่งเห็น feature นี้ ก็เลยเอามาลงให้ดูว่า พฤติกรรมการใช้ google ของผมเป็นอย่างไรบ้าง

Related link from Roti

Tuesday, January 03, 2006

Beehive

Beehive เดิมเป็น product ของ BEA
ต่อมาก็เปิดเป็น opensource ภายใต้ project ของ apache group

Beehive เป็น Framework ที่ต่อยอดจาก Struts 1.1
โดยเพิ่มเติม feature เหล่านี้ลงไป
  • Page Flows
    มีการจัดกลุ่ม flow ให้เป็น 1 flow ต่อ 1 controller
    เมื่อ gen เป็น struts แล้ว จะเทียบได้เป็น 1 flow ต่อ 1 struts module
    นอกจากนี้ยังสามารถทำ nested flow ได้ด้วย
  • Controls
    แนวเดียวกับ Spring
    ก็คือ ใช้ POJO มาจับ business logic
  • Web Services
    อันนี้ไม่พิสดารอะไร แค่ mapping POJO เป็น web service


ประเด็นที่น่าสนใจมาก ก็คือ
มีการนำ Annotation มาใช้แทนที่ configuration file แบบเดิมๆที่เป็น xml file
โดย Beehive ใช้ Annotation Processing Tool เข้ามาช่วยในการ
generate struts-config file

ผลที่ได้ จัดได้ว่าไม่เลยทีเดียว
แค่เปิด controller class ดูตัวเดียว ก็เห็น flow ทั้งหมดของมันใน shot เดียว
ไม่ต้องไปไล่เปิดดูใน struts-config.xml เหมือนเมื่อก่อน
ลองดูตัวอย่างที่ผมทำตาม tutorial ดู
package user;
import org.apache.beehive.netui.pageflow.Forward;
import org.apache.beehive.netui.pageflow.PageFlowController;
import org.apache.beehive.netui.pageflow.annotations.Jpf;

import shared.SharedFlow;

@Jpf.Controller(
simpleActions={
@Jpf.SimpleAction(name="begin", path="/user/index.jsp"),
@Jpf.SimpleAction(name="toRegist", path="/user/regist.jsp")
},
sharedFlowRefs={
@Jpf.SharedFlowRef(name="shared", type=SharedFlow.class)
}
)
public class Controller extends PageFlowController {
@Jpf.SharedFlowField(name="shared")
private SharedFlow shareFlow;

private UserForm userForm;

@Jpf.Action(
forwards={
@Jpf.Forward(name="success", path="/user/display.jsp")
},
validatableProperties = {
@Jpf.ValidatableProperty(
propertyName = "name",
displayName = "Name",
validateRequired = @Jpf.ValidateRequired(),
validateMaxLength = @Jpf.ValidateMaxLength(chars = 30)),
@Jpf.ValidatableProperty(
propertyName = "age",
displayName = "Age",
validateRequired = @Jpf.ValidateRequired(),
validateRange = @Jpf.ValidateRange(minInt = 0, maxInt = 130))
},
validationErrorForward =
@Jpf.Forward(name="fail", navigateTo=Jpf.NavigateTo.currentPage)
)
public Forward processData(UserForm form) {
getRequest().setAttribute("data", form);
return new Forward("success");
}

@Jpf.Action(
useFormBean = "userForm",
forwards = {
@Jpf.Forward(name="getCompanyFlow",
path="/company/getCompany.do")
},
doValidation=false
)
protected Forward getCompany(UserForm form) {
return new Forward("getCompanyFlow");
}

@Jpf.Action(
forwards= {
@Jpf.Forward(name="success",
navigateTo=Jpf.NavigateTo.currentPage)
}
)
protected Forward companySelected(String company) {
userForm.setCompany(company);
Forward success = new Forward("success", userForm);
return success;
}

}

Note: จะเห็นว่ามี private instance ที่เป็น formbean อยู่ใน controller ด้วย
อันนี้ใช้ keep ค่าไว้ในกรณีที่เรามีการ flow ไปหลาย screen หรือ กระโดดไปทำงานใน subflow

จาก controller ข้างบน Beehive ก็จะ gen เป็น struts-config ให้
หน้าตาประมาณนี้
  <form-beans>
<form-bean className="org.apache.beehive.netui.pageflow.config.PageFlowActio
nFormBean" name="userForm" type="org.apache.beehive.netui.pageflow.internal.AnyB
eanActionForm">
<set-property property="actualType" value="user.UserForm"/>
</form-bean>
...

<action-mappings>
<action className="org.apache.beehive.netui.pageflow.config.PageFlowActionMa
pping" parameter="user.Controller" path="/begin" scope="request" type="org.apach
e.beehive.netui.pageflow.internal.FlowControllerAction" validate="false">
<set-property property="readonly" value="true"/>
<set-property property="simpleAction" value="true"/>
<set-property property="defaultForward" value="_defaultForward"/>
<forward contextRelative="true" name="_defaultForward" path="/user/index.j
sp"/>
</action>
<action className="org.apache.beehive.netui.pageflow.config.PageFlowActionMa
pping" name="string" parameter="user.Controller" path="/companySelected" scope="
request" type="org.apache.beehive.netui.pageflow.internal.FlowControllerAction"
validate="false">
<set-property property="formClass" value="java.lang.String"/>
<forward className="org.apache.beehive.netui.pageflow.config.PageFlowActio
nForward" name="success" path="currentPage">
<set-property property="returnToPage" value="true"/>
</forward>
</action>
.....
</action-mappings>

<controller className="org.apache.beehive.netui.pageflow.config.PageFlowContro
llerConfig" inputForward="true" processorClass="org.apache.beehive.netui.pageflo
w.PageFlowRequestProcessor">
<set-property property="isReturnToActionDisabled" value="true"/>
<set-property property="sharedFlows" value="shared=shared.SharedFlow"/>
<set-property property="controllerClass" value="user.Controller"/>
<set-property property="isMissingDefaultMessages" value="true"/>
</controller>


ถ้าลองไปอ่าน source code ส่วน generate ของมัน ก็จะยิ่งสนุก
เขาใช้ Velocity เป็น template engine

อ้อลืมบอกไป นอกจากเพิ่มส่วน pageflow ลองไปแล้ว
Beehive ก็มี set ของ taglibrary ให้ใช้จำนวนหนึ่งด้วย
โดยมีพวก Data Grid กับ Tree ให้ใช้ด้วย
ลองดูตัวอย่างของ submit form
<%@ page language="java" contentType="text/html;charset=UTF-8"%>
<%@ taglib uri="http://beehive.apache.org/netui/tags-databinding-1.0" prefix="ne
tui-data"%>
<%@ taglib uri="http://beehive.apache.org/netui/tags-html-1.0" prefix="netui"%>
<%@ taglib uri="http://beehive.apache.org/netui/tags-template-1.0" prefix="netui
-template"%>
<netui:html>
<head>
<title>User Register Page</title>
<netui:base/>
</head>
<netui:body>
<p>
Register Page
</p>
<netui:form action="processData">
Name: <netui:textBox dataSource="actionForm.name"/>
<br/>
Age: <netui:textBox dataSource="actionForm.age"/>
<br/>
Company: <netui:textBox dataSource="actionForm.company"/>
<netui:button type="submit" action="getCompany" value="Select Company"/>
<br/>
<netui:button type="submit" value="Submit"/>
</netui:form>
</netui:body>
</netui:html>


ใครที่สนใจเรื่อง architecture ถ้าเคยใช้ struts อยู่แล้ว
ก็น่าจะลองเข้าไปศึกษาดูว่า เขาออกแบบ extension อย่างไร

Related link from Roti

Wavelet Enterpricse Management Portal

Wavelet Enterpricse Management Portal
ชื่อ app มีคำว่า portal แต่จริงๆแล้วมันคือ ERP ตัวหนึ่ง
เป็น Web Application
ใช้ database Postgres
แล้วก็ deploy บน jboss

คนเขียนอยู่ไกล้ๆนี่เอง Singaport กับ Malaysia
(ตอนแรกที่ไม่รู้ เห็น ชื่อ author ใน source code แล้วยังรำพึงเลยว่า
ทำไมมี developer เป็นคนจีนเยอะจัง)

Web Framework ที่ wavelet ใช้ เป็น inhouse framework
ก็คือมี properties file ตัวหนึ่งเป็นตัวกำหนดว่า uri ที่เข้ามาต้อง
ไปเรียก Action ตัวไหน

Domain implement ด้วย EJB
ที่น่าสนใจก็คือ ไม่ได้ใช้ Session Bean เลย
แต่ใช้ Java Bean ธรรมดาในการจัดการกับ business logic

เอกสารในการ install อยู่ใน setup.sh
เริ่มจาก download jboss มาก่อน
โดยใช้ version 3.0.7
ที่ใช้ตัวนี้เพราะ file datasource service ของ Wavelet ที่อยู่ใน source code
มันใช้วิธีการ config ของ jboss 3.0.x

postgres ผมใช้ 7.4.1

ทดสอบ deploy มีปัญหาที่ entity bean emp-accounting.jar
เป็นปัญหาประมาณว่า

Document root element is missing.:-1:1

เดาว่าน่าจะเป็นเรื่องเนื้อหาใน file ejb-jar.xml, jboss.xml ก็เลย
สร้าง file ใหม่แล้ว copy & paste เนื้อหาใน file เก่ามาใช้
จากนั้นก็ทดลอง deploy อีกที
ผ่านฉลุย
(ช่างเป็น error message ที่ไม่สื่อความหมายเอาเสียเลย)

ผ่านจากนี้ไปก็ไปเจอปัญหา emp-erm.jar deploy ไม่ผ่าน
ปัญหานี้เกิดจาก descriptor file ของมันเขียนชื่อ bean ผิด
เอาว่าคงมีคนใช้ search & replace เข้าไป scan แล้วแก้เกิน

จากนั้นก็ไปติดปัญหา password ตรงหน้า login
password เขา encrypt ไว้ โดยเก็บในบน table user_index
มี datatype เป็น bytea
ใน script setup เขียน comment ไว้ว่า ใช้ password เป็น "nobody"
แต่ทดลองแล้วก็ไม่ผ่าน
สุดท้ายเลยต้องเขียน program เข้าไป update ใน database เอง
ที่ต้องเขียนโปรแกรม ก็เพราะว่า wavelet เขาใช้ encrypt engine ของเขาเอง

ประเด็นหนึ่งที่เห็นใน source code ของ wavelet ก็คือ
วิธีที่เขาใช้ตรวจสอบว่า password ถูกต้องหรือเปล่า
ถ้าเป็นเราเขียน เราก็คงจะใช้วิธี hash encrypt password ที่ user กรอก
แล้วค่อยเปรียบเทียบกับ password ที่เก็บใน table
แต่ wavelet เขียนว่า ให้ดึง password ที่ encrypt เก็บไว้ใน table
ขึ้นมาทำการ decrypt แล้วค่อยเปรียบเทียบกับ password ที่ user กรอกมา

ผ่านจากหน้า login เข้าไปได้ ก็ไปเจอปัญหาว่า
layout มันรวนเรไปหมด
ตอนแรกก็เอาว่า สงสัยมันเขียนให้ใช้บน IE เป็นหลัก
อุตส่าห์ไปขุดหา IE มาทดลองเล่นดู ก็ยังไม่ได้อยู่ดี

สุดท้ายก็ไปพบว่า jsp comment ที่ใส่ไว้มันมีปัญหา
jsp ใน wavelet เขาใช้ style นี้

<%---------------- Section -------------%>

เปลี่ยนใหม่ให้เป็น

<%-- ------------- Section ---------- --%>

(จริงๆ ก็ไม่ได้แก้หรอก ใช้วิธีลบทิ้งเร็วกว่า)
ปรากฎว่า ทำงานได้
สิ่งมหัศจรรย์เกิดขึ้นอีกแล้ว
เลยไปนั่งทดสอบ jsp กับ jetty 5.x แล้วก็ tomcat 5.0.x
ปรากฎว่าทั้งคู่ ก็สามารถใช้ comment แบบยาวเป็นพรืดได้
ผู้ต้องสงสัยก็เลยไปตกอยู่ที่ jetty ที่ embed มากับ jboss 3.0.7

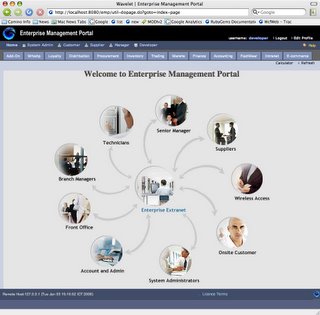
หน้าตาของ wavelet ดูไม่เลวเลย (หน้าแรก)

Related link from Roti

Monday, January 02, 2006

CLisp Circular List

อ่านเจอใน Using Circular Structures in CL

คำสั่ง nconc ใช้สำหรับการเชื่อม list 2 อันเข้าด้วยกัน
โดยมันจะไปเปลี่ยน pointer ตัวสุดท้ายของ list อันแรก
(ซึ่งปกติชี้ไปที่ nil อยู่) ให้เปลี่ยนไปชี้ที่ element แรกของ
list ตัวที่ 2

CL-USER> (setf first-list '(1 2 3))
(1 2 3)
CL-USER> (nconc first-list '(4 5 6))
(1 2 3 4 5 6)
CL-USER> first-list
(1 2 3 4 5 6)
CL-USER>


จะเกิดอะไรขึ้น ถ้าเราสั่ง (nconc first-list first-list)

CL-USER> (nconc first-list first-list)
#1=(1 2 3 4 5 6 . #1#)

น่าสนใจมาก เมื่อ pointer ตัวสุดท้ายมาชี้ที่ element ตัวแรก
ก็เลยเกิดเป็น circular list ขึ้นมา

ทดลองสั่ง loop 10 ครั้งดู

CL-USER> (loop for i from 1 to 10
do (format t "~a~%" (elt first-list i)))
2
3
4
5
6
1
2
3
4
5
NIL

elt คือคำสั่งที่ใช้ access element ลำดับที่ต้องการ จาก list
เช่น (elt '(1 2 3) 1) จะได้ 2 ออกมา

จะเห็นว่า เราสามารถ loop ไปใน array นี้ได้ไม่รู้จบ

ที่นี้มันจะมาเป็น feature ได้ตรงไหน
มีตัวอย่างหนึ่งของ Thomas A. Russ เขาเขียนเป็น sample ให้ดู
เริ่มด้วย

(defun circular-list (&rest elements)
(let ((backbone (copy-list elements)))
(nconc backbone backbone)))

(defvar *days* (circular-list 'mon 'tue 'wed 'thur 'fri 'sat 'sun))

มีการกำหนด function ที่ชื่อ circular-list
ซึ่งการทำงานภายในก็คือการสั่ง nconc
ส่วน variable *days* ก็คือ circular list ของ วันในสัปดาห์

ที่นี้ลองดู function นี้
(defun days-of-month (n-days starting-day)
(loop for d from 1 to n-days
as day in (member starting-day *days*)
do (format t "The ~:R is a ~:(~A~).~%" d day)))


ทดลองสั่งทำงานดู
CL-USER> (days-of-month 15 'mon)
The first is a Mon.
The second is a Tue.
The third is a Wed.
The fourth is a Thur.
The fifth is a Fri.
The sixth is a Sat.
The seventh is a Sun.
The eighth is a Mon.
The ninth is a Tue.
The tenth is a Wed.
The eleventh is a Thur.
The twelfth is a Fri.
The thirteenth is a Sat.
The fourteenth is a Sun.
The fifteenth is a Mon.
NIL

Related link from Roti