ซึ่งมักจะต้องเสียเวลาในการ setup environment ต่างๆให้เข้าที่เข้าทาง
อย่างกรณี การใช้ Hibernate
ที่ผมเลือกวิธีการใส่ XDoclet Tag ลงไปใน java code โดยตรง
แล้วค่อยใช้ XDoclet ในการ generate Mapping file ออกมา
ทุกๆครั้งที่เริ่ม project ใหม่ (กรณีถ้าใช้ ant)
ก็ต้องมีการ copy XDoclet library ไปไว้ที่ lib
จากนั้นก็ต้องเขียน(copy) Ant Target ที่ทำหน้าที่
scan java file เพื่อสร้าง hbm.xml file
(ไม่ยาก แต่น่าเบื่อ และช้า เพราะนานๆทำที
ก็จะจำไม่ค่อยได้ว่าต้องทำอะไรบ้าง)
การใช้ maven เข้ามาช่วย ก็เป็นการแก้ปัญหาได้อีกวิธีหนึ่ง
เนื่องจาก maven มี XDoclet Plugin อยู่แล้ว
แค่กำหนด properties บางตัวเพิ่ม
ก็สามารถเรียกใช้ Hibernate Doclet Task ได้เลย
แต่เนื่องจากผมเป็นคนที่จิตไม่ค่อยหยุดนิ่ง
ก็เลยมองหาวิธีใหม่ๆเรื่อยๆ
ตอนนี้สนใจอยู่วิธีหนึ่ง
ก็คือการ implement Eclipse Plugin
ที่ทำหน้าที่ในการสร้าง Hibernate hbm.xml file โดยเฉพาะ
หลังจากลอง search ดูใน net แล้ว
ก็เจอว่า JBoss IDE Plugin มี module
XDoclet อยู่ในตัวด้วย
แต่ยังไม่ค่อยถูกใจนัก เนื่องจากเราต้องการใช้แค่ส่วน
Generate Hibernate 's Mapping file
เพียงอย่างเดียว แต่ได้ของแถมมาเต็มไปหมด
(เดี๋ยวนี้รู้สึกว่า Eclipse ที่ลงไว้ มันช้าลงทุกวัน
ตอนนี้ก็เลยโทษ พวก plugin
ที่ประดังใส่เข้ามานี่แหล่ะ ที่เป็นต้นเหตุ)
เริ่มแรกสุด Extension Point ที่เราสนใจ
Implement ก็คือ Extension Point
ในส่วนของ org.eclipse.core.resources.builders
ที่ทำหน้าที่ transform resource file
(อย่าง java builder ก็ทำหน้าที่แปลง java file
ให้เป็น class file)
โดย builder จะถูกเรียกใช้ได้ 2 กรณี
ก็คือ
- เรียกใช้เมื่อ platform พบว่า resource file มีการเปลี่ยนแปลง (incremental build)
- เรียกใช้กรณีที่ user สั่ง clean ซึ่งเท่ากับเป็นการบังคับ
ให้ build project ใหม่หมด (full build)
ใน 1 project สามารถมี builder ได้มากกว่า
1 ตัว โดยจะทำงานตามลำดับที่เรา config ไว้
การที่จะใส่ builder เข้าไปใน project ได้นั้น
เรามักออกแบบให้ builder depend กับ nature ของ project
โดยมักออกแบบให้ user สามารถ เพิ่มหรือลด nature ของ project
ได้จากหน้าจอ Project Properties
(อีกทีที่นิยม ก็คือที่จุดเริ่มต้นของการสร้าง new project
โดยมี template ให้เลือกเลย ว่าต้องการ project แบบไหน)
แน่นอนว่าการ implement nature เพิ่ม
ก็ต้องทำผ่าน Extension Point ของ Eclipse เช่นกัน
(นี่เป็นสาเหตุที่ผมชอบ architecture ของ eclipse
เป็น design ที่งามจริงๆ)
โด extension point นี้มีชื่อว่า org.eclipse.core.resources.natures
ส่วน extension point อันถัดไปก็คือ org.eclipse.ui.propertyPages
ที่เราใช้เป็น UI ที่รับคำสั่ง add nature หรือ remove nature
โดย extension ในส่วนนี้ จะทำให้ user เห็น ui
ของเราในหน้าจอ Project Properties ได้
ลองมาดู source code กันบ้าง
เริ่มด้วยการสร้าง Builder ขึ้นมาจาก IncrementalProjectBuilder
โดยในตอนนี้ยังไม่มีการ implement การทำงานจริง (ทำโครงก่อน)
public class HbBuilder extends IncrementalProjectBuilder {

    public static final String BUILDER_ID = "com.mx.plugins.hbdoclet.hibernateDo
cletBuilder";

    protected IProject[] build(int kind, Map args, IProgressMonitor monitor)
            throws CoreException {
        // TODO Implement Logic here

        return null;
    }

}
add Extension Point org.eclipse.core.resources.builders
<extension
      id="hibernateDocletBuilder"
      name="Hibernate Doclet Builder"
      point="org.eclipse.core.resources.builders">
   <builder>
      <run class="com.mx.plugins.hbdoclet.HbBuilder"/>
   </builder>
</extension>
จากนั้นก็ทำการ add Nature ใหม่ที่เราต้องการเข้าไปใน platform
โดยใช้ extension point org.eclipse.core.resources.natures
<extension
      id="hbdocletnature"
      name="Hibernate Doclet Nature"
      point="org.eclipse.core.resources.natures">
   <runtime>
      <run class="com.mx.plugins.hbdoclet.ProjectNature"/>
   </runtime>
</extension>
ตัว ProjectNature ของเรา เขียนง่ายๆดังนี้
public class ProjectNature implements IProjectNature {

    protected IProject project;

    public void configure() throws CoreException {
        IProjectDescription desc = project.getDescription();
        ICommand[] commands = desc.getBuildSpec();
        boolean found = false;

        for (int i = 0; i < commands.length; i++) {
            if (commands[i].getBuilderName()
                    .equals(HbBuilder.BUILDER_ID)) {
                found = true;
                break;
            }
        }

        if (! found) {
            ICommand command = desc.newCommand();
            command.setBuilderName(HbBuilder.BUILDER_ID);
            ICommand[] newCommands = new ICommand[commands.length + 1];

            System.arraycopy(commands, 0, newCommands, 0, commands.length);
            newCommands[commands.length] = command;
            desc.setBuildSpec(newCommands);
            project.setDescription(desc, null);
        }
    }

    public void deconfigure() throws CoreException {
        ...
    }

    public IProject getProject() {
        return project;
    }

    public void setProject(IProject project) {
        this.project = project;
    }

}
จากนั้นก็ทำการ add PropertyPages Extension
<extension
      point="org.eclipse.ui.propertyPages">
   <page
         adaptable="true"
         class="com.mx.plugins.hbdoclet.properties.ProjectPropertyPage"
         id="com.mx.plugins.hbdoclet.properties.ProjectPropertyPage"
         name="hbdoclet"
         objectClass="org.eclipse.core.resources.IProject">
        <filter
            name="nature"
            value="org.eclipse.jdt.core.javanature">
        </filter>
   </page>
</extension>
หลักการของ property page ก็คือ เราต้องระบุว่า
Object อะไรที่เราต้องการให้ set property ตัวนี้ได้
ในกรณีของเรา ก็คือ org.eclipse.core.resources.IProject
ซึ่งหมายถึง ตัว project
(กรณีถ้าต้องการ property ระดับ file
ก็จะใช้
org.eclipse.core.resources.IFile)ส่วน filter นั้นใช้ในการกรอง project
คือยอมให้เฉพาะ project ที่มี attribute nature
เป็น JavaNature เท่านั้น ถึงจะยอมให้เห็น property นี้
ตัว class
om.mx.plugins.hbdoclet.properties.ProjectPropertyPageของเรา extends มาจาก org.eclipse.ui.dialogs.PropertyPage
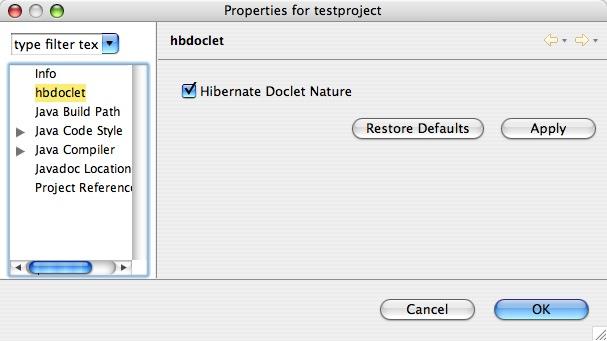
หน้าตาของ propertyPage ที่ design ไว้เบื้องต้น
จะมีหน้าตาประมาณนี้
เมื่อ user กดปุ่ม ok
เราก็จะทำการสั่งให้มีการ apply Nature หรือ remove Nature
โดยใช้ IWorkspaceRunnable เพื่อจะได้ spawn background thread สำหรับ run โดยเฉพาะ
protected void doOk(IProgressMonitor monitor) throws CoreException {
    IWorkspaceRunnable runnable = new IWorkspaceRunnable() {
        public void run(IProgressMonitor monitor) throws CoreException {
            if (hbdocletNatureCheck.getSelection()) {
                // add nature
                HbdocletPlugin.addNatureToProject(getProject(), true);
            } else {
                // remove nature
                HbdocletPlugin.removeNatureFromProject(getProject());
            }
            if (hbdocletNatureCheck.getSelection()) {
                IProject project = getProject();
                project.build(IncrementalProjectBuilder.FULL_BUILD,
                                monitor);
            }
        }

    };
    HbdocletPlugin.getWorkspace().run(runnable, monitor);
}

protected IProject getProject() throws CoreException {
    IProject project = (IProject) (this.getElement()
            .getAdapter(IProject.class));
    return project;
}
ให้สังเกตุว่าเราใช้ IWorkspaceRunnable เพื่อที่จะ apply nature โดยใช้ background thread
การ apply nature เข้ากับ project ทำดังนี้
public static void addNatureToProject(IProject project,
            boolean forceOrder) throws CoreException {

    IProjectDescription description = project.getDescription();
    List natures = new ArrayList(Arrays.asList(description.getNatureIds()));
    if (!natures.contains(NATURE_ID)) {
        if (forceOrder) {
            natures.add(0, NATURE_ID);
        } else {
            natures.add(NATURE_ID);
        }
        description.setNatureIds((String[]) natures
                .toArray(new String[natures.size()]));
        project.setDescription(description, null);
    }
}
ตัว key ของการ apply nature ก็คือ IProjectDescription
ที่ทำให้เรา access Project Description file ได้
สำหรับตัว
Project Description File ใครที่เคยใช้command line เข้าไปดูใน project directory คงจะเคยเห็น file ที่ชื่อ
.project มาแล้ว เจ้า file นี้แหละที่เป็น serialize ของ Project Description Fileหลังจากที่ได้ add nature เข้าไปแล้ว
หน้าตาของ
.projectก็เป็นดังนี้
<?xml version="1.0" encoding="UTF-8"?>
<projectDescription>
        <name>testproject</name>
        <comment></comment>
        <projects>
        </projects>
        <buildSpec>
                <buildCommand>
                        <name>org.eclipse.jdt.core.javabuilder</name>
                        <arguments>
                        </arguments>
                </buildCommand>
                <buildCommand>
                        <name>com.mx.plugins.hbdoclet.hibernateDocletBuilder</na
me>
                        <arguments>
                        </arguments>
                </buildCommand>
        </buildSpec>
        <natures>
                <nature>com.mx.plugins.hbdoclet.hbdocletnature</nature>
                <nature>org.eclipse.jdt.core.javanature</nature>
        </natures>
</projectDescription>


No comments:
Post a Comment